Introduction
This guide is a general overview of how to use and configure the netDocShare Hybrid Search Web Parts (formerly known as netDocShare Integrated Search) designed for SharePoint Online and SharePoint on-Prem.
Note: netDocShare Hybrid Search feature is only available to Enterprise level clients.
The netDocShare Hybrid Search webpart is a fully configurable view that can show consolidated search results from SharePoint search and NetDocuments search. It comes out-of-the-box with the following features:
- A specialized config builder view that allows non-technical users to create netDocShare Hybrid views
- 2 View Mode options: Accordion view and Tab view plus an option to view both SharePoint and NetDocuments results in a 1 result list or 2 separate lists
- Compact options which will only display a search box or a filters box and will redirect to a search results page
- 3 Powerful Search options:
- Search in a specific SharePoint List (SharePoint)
- Search across the entire tenant (SharePoint)
- Search across one or multiple cabinets (NetDocuments)
- Configurable search result tables with dynamic column retrieval from both SharePoint and NetDocuments.
- Filters that can also be dynamically retrieved. Filters can be set as shared or individual in case of data mismatch or discrepancy between the two data sources
- Filtering and sorting options for SharePoint results
Please see the screenshots below displaying several different view options and configurations for netDocShare Hybrid Search view:
Compact Implementation
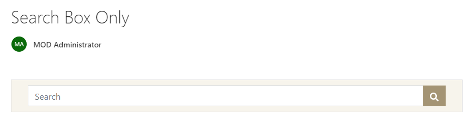
Search Box Only: User is able to create a compact search box to include in any of the pages by using the config settings in order to display a search box.
Config setting:
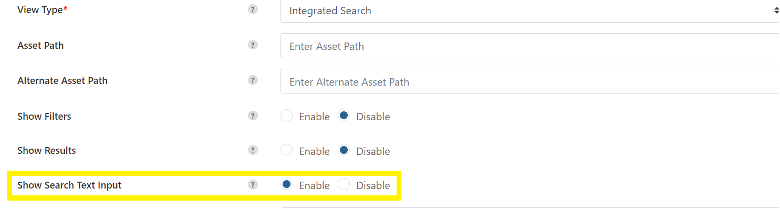
Search box in Webpart:
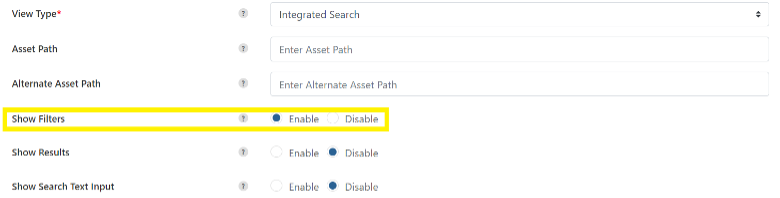
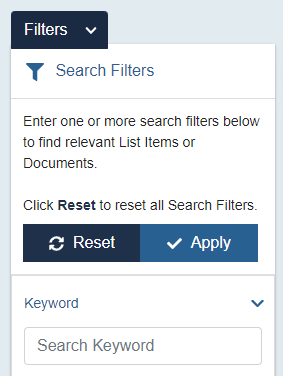
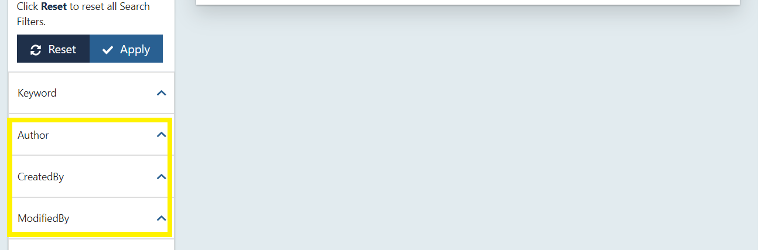
Filters Only: The user can create a small webpart which is only for showing the Filters. This will help users to get the search bar and configured filters within the webpart.
Note: In filters after choosing the options, a user needs to click Apply button to make them applicable in the results. To remove the filters user needs to click the Reset button.
Config setting:
Filters in Webpart:
Results View
The results view will give the ability to open the results in different ways. The two available views are Separate view and Hybrid view.

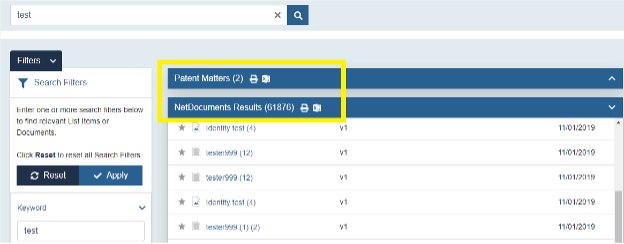
Separate view: In the separate view a user can see the SharePoint and NetDocuments results individually.
Config settings:
Separate view and Accordion mode Hybrid search results:
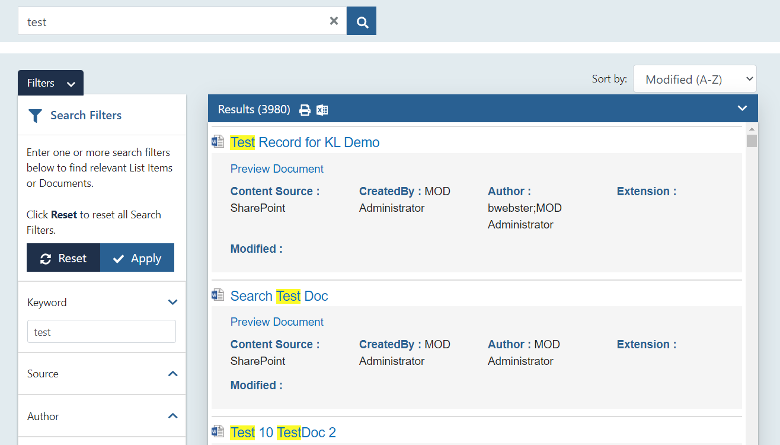
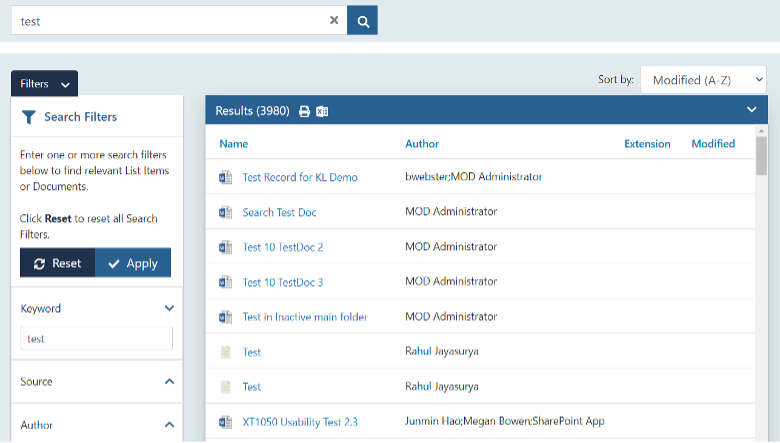
Hybrid View: In Hybrid mode a user will get combined results as per the config settings. Also, in Hybrid mode a user can choose two options: Summary view and Detailed view.
Summary view: In Summary view a user can see the results in small blocks for each document.
Detailed View: In the Detailed view a user can see the detailed results in a table.
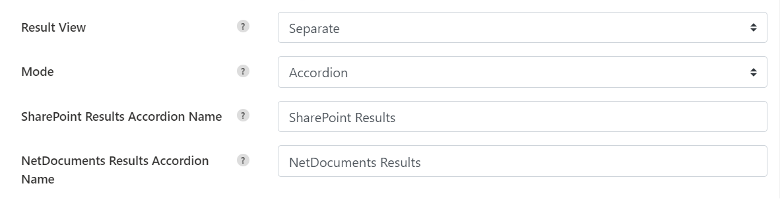
Mode
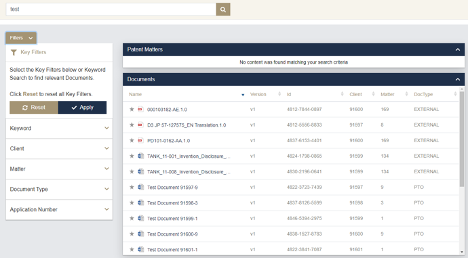
Accordion Mode: In the Accordion mode a user will see the results in a vertically stacked list. See below an image of Search result’s accordion view with filters for more clarity.
Config settings:
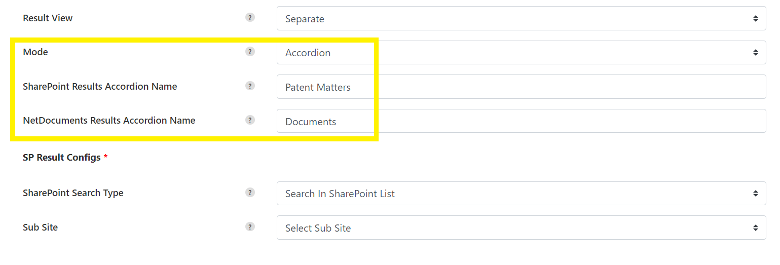
Note: The accordions’ names are configurable in the config settings. If the user left them blank, then they will show as SharePoint Results and NetDocuments Results
Search result’s accordion view with filters:
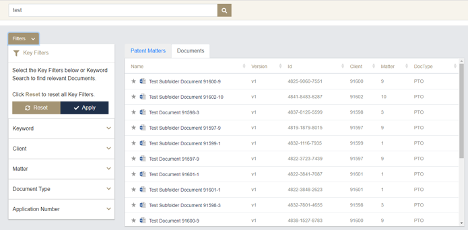
Tab Mode: In the Tab mode user will see the results in Tabs as shown in the image below of Search results tab view with filters.
Config Settings:
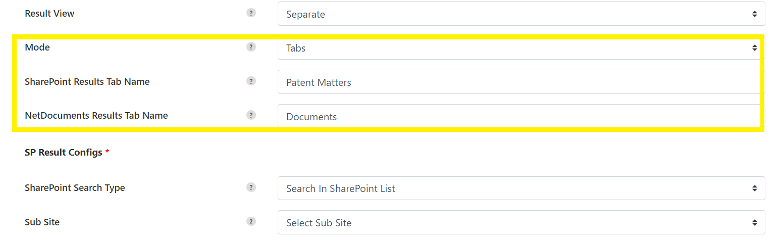
Note: The Tab names are configurable in the config settings. If the user left them blank, then they will show as SharePoint Results and NetDocuments Results.
Search results tab view with filters:
Config Builder for netDocShare Hybrid
Choose options that you would like to show on Webparts. The possible options include:
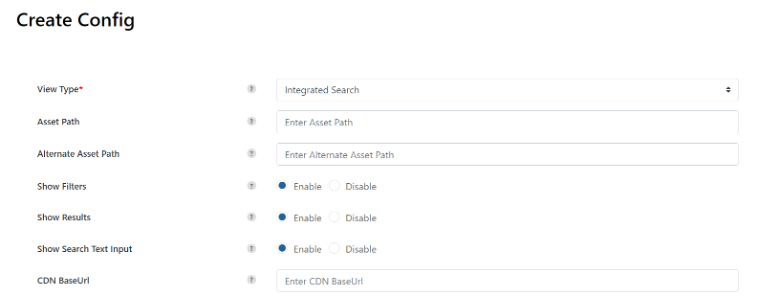
View Type: Integrated Search
Asset Path: Asset Path is the full path where static assets are stored and must be obtained during deployment. This config is mandatory as it is also used to determine licensing information. This field will be hidden in the config builder as it can be derived from the application’s asset path.
If you are in SharePoint online (currently included in the config above) your asset path may look like the following:
https://{yourSharepointTenant}/sites/AppCatalog/ClientSideAssets/23dea53d-fbee-49c3-8b16-c6b586b0422f/
If you are on SharePoint on-Prem your asset path might look like the following:
https://{yourSharepointTenant}/SiteAssets/netDocShare/assets/images/folderIcons/
Alternate Asset Path: TheUser can provide an additional asset path same as the asset path selected.
Show Filters, Show Results and Show Search Text Input are three values that control which components appear on the page. For the full results page, all should be turned to true. If you are aiming to create a search box only implementation, turn filtersOn and resultsOn to false. For a filters’ only implementation, turn SearchBoxOn and resultsOn to false. If All 3 values are turned false, the user will see an error suggesting that at least one of these values should be on.
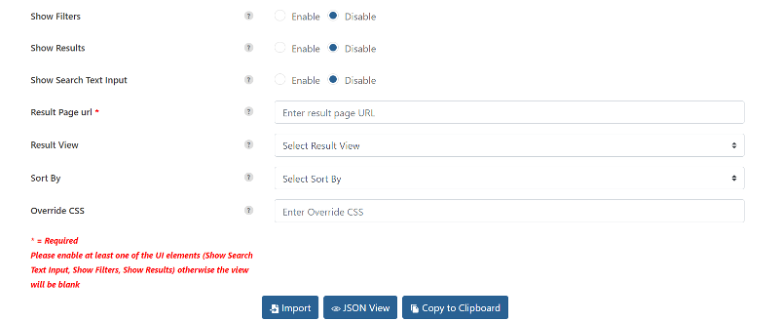
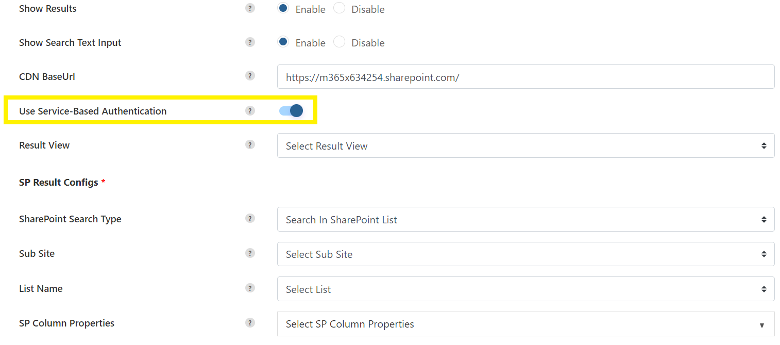
CDNBaseUrl should be the root url of your SharePoint Site Collection. This URL must end with a forward slash: ‘/’
Use Service-Based Authentication: (available from version 2.4.1 onwards) a new service-based authentication model which will do away with the previous requirements to create local SharePoint Auth pages and submit redirect URLs for each client. This is available from v2.4.1 onwards and will take effect immediately upon installation. NOTE: This will NOT disrupt the previous auth system for clients who do not wish to switch and it can be reverted to the previous system at any time. However, we highly encourage the update as it confers many benefits to users and administrators alike. Below is a table comparing the features of each system.
Universal authentication URL: https://services.klobot.ai/apps/live/netdocshare/srvc/auth
Results View: As mentioned above in Results View and Mode sections user will be able to choose different types in presenting the results.
SharePoint Results Configuration
There are 2 main search options when it comes to searching in SharePoint:
- Search in specific list(s) or library(s)
- Search across all content in SharePoint

This essential option can be controlled by a property called “SharePoint Search Type” which can be configured in the config builder.
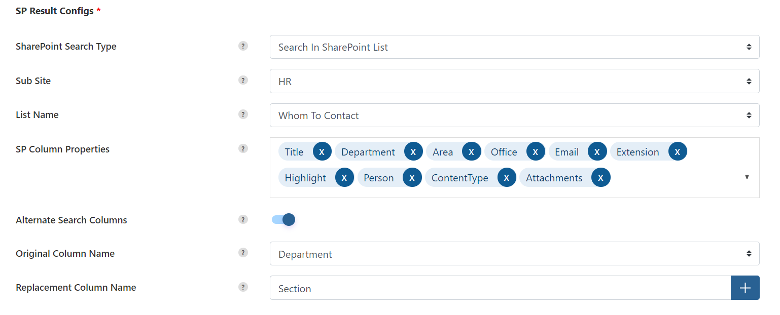
Search in specific list
Searching in a list is for use cases in which you have important metadata columns that need to be searched in SharePoint along with document results from NetDocuments. This search option requires a few inputs:
- Sub Site: The subsite where the list is located. We will present you with a list of options retrieved automatically
- List Name: The name of the list that you want to reference
- SP Column Properties: Select the columns you would like to display when the search results are returned
- Alternate Search Columns (optional): Specify, if necessary. Alternate names for columns if there are issues with using the original
Search across a tenant
This search type uses the site collection managed properties to search across the entire tenant. Managed properties are properties which are tied to ‘crawled properties’ which are linked to created columns in existing lists or libraries. They can be configured in the Site settings. Here are the inputs required by the Tenant search option:
A managed property and a logical relationship that describes what to search for
-
- Example: “Author={searchQuery}” or “AuthorContains{searchQuery}”
- This will generate a KQL SharePoint query in the background to execute
- If users are well-versed in constructing SharePoint queries using KQL, users may opt to use the advanced option to use a literal KQL query
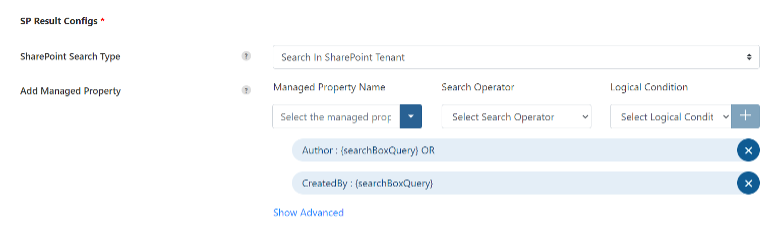
User can directly configure the URL by clicking on the show advanced option.

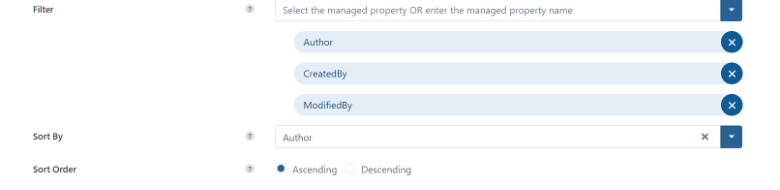
Filters: User can configure the filters that are available from the SharePoint site.

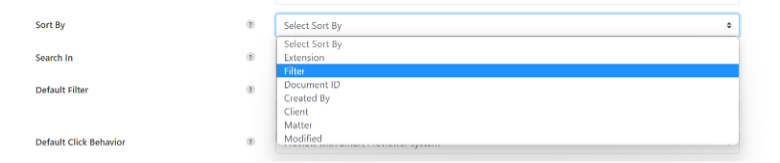
Sort By: User can sort their documents, folders, searches by. Leaving this field empty means that the webpart will default sort by the ‘name’ property. User can also choose the order as Ascending or Descending.
NetDocuments Results Configuration
Searching in NetDocuments will use the v2 NetDocuments search API. The NetDocuments config settings and their uses are as follows.
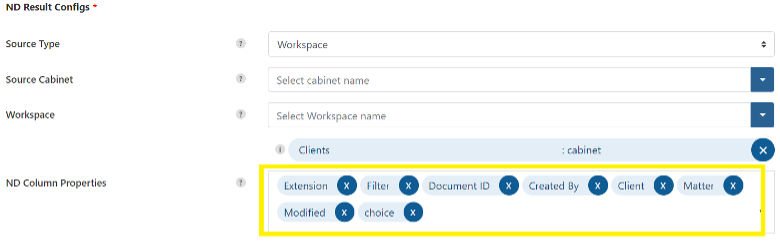
Source Type: Source can be a Cabinet or Workspace

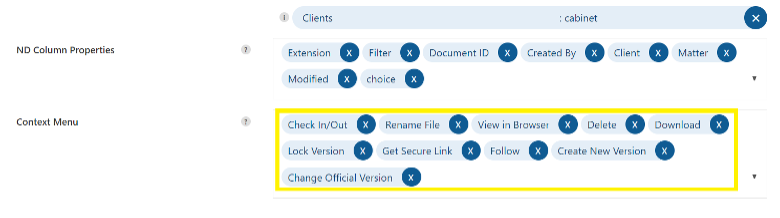
ND Column Properties: column Properties are a collection of NetDocuments properties by which you would like to see and sort your documents. The Document Viewer WebPart displays “name” as the first default document property to display, and in this example, “Ext“, “id“, “created By“, “modified” are the next four customizable document properties to display. ‘Ext’ or extension translates to “Document type,” “DocId” to “Document Id,” “created By” to “Pillsbury author,” and “modified” to “Date modified”
Context Menu: context Menu determines what options will appear in the dropdown context menu that is opened from clicking the “…” button beside each document. The context Menu can be disabled by completely removing the key and value from the config object. Users can add other options indicated in the list below: “Check in/out”, “Rename File”, “View In Browser”, “Delete”, “Download”, “Lock Version”, “Get Secured Link”, “Follow”, “Create New Version”, “Change Official Version”.
If you omit the values for “context Menu”, our webpart will select the default options of “open” and “preview”. This can be changed by editing the JSON manually or picking the values from the corresponding dropdown menus in the config Builder. Please see an example of the Context Menu with all options turned on below:
Sort By: Sorting Documents can be sorted and reverse-sorted by clicking or double-clicking on the column property-title by which you want to sort. Each WebPart also comes with a ‘defaultSortProperty’ that can be used to determine which data column the component will use to sort by default. These properties are based on the standard attributes that exist on each NetDocuments entity.
Search In: Search In is a property which determines on what column the value will be searched in. We currently offer 2 options: “Title” will only look for your search term in the document or container title, whereas “Everything” will look for the search term across all metadata columns and also search inside the document’s content

Default Filter: Default Filter is a hidden filter that will be applied to all NetDocuments searches in the background. Example:
{“ParentClient”:”91597″}}
Adding this to your config should add the additional filter of “ParentClient” with the value “91597” to every NetDocuments search.

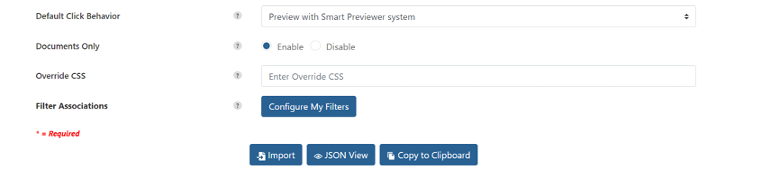
Default Click Behavior: All documents displayed in a WebPart, upon click, will (by default) open the document’s profile page on the NetDocuments site. This default click behavior is customizable using your config options. Please see our section on config options to customize this behavior. There are a few different behaviors that users can select:
- Profile on NetDocuments (default): “Profile on NetDocuments” is the default. It will navigate to the document profile page on NetDocuments.com. As this is a default, users can choose to leave out this config
- Preview with Secure Link Enabled: This will use the NetDocuments “Secure Link” feature to construct a secure URL. This will directly engage the full-screen browser preview without going to NetDocuments.com
- Preview with Secure Link Disabled: This will use the NetDocuments “GoID” feature to construct a URL. Navigating to the URL will open the document profile page on NetDocuments.com and open a full-screen browser preview
- Preview with Smart Previewer System: This uses a preview functionality to open the document within the document grid
- Download: This option will simply download the selected document on click
Documents Only: Documents Only is an option which, when enabled, will ignore all results that are not specifically documents. Containers such as folders, workspaces, collabspaces or other objects such as filters, saved searches etc. will be omitted

Override CSS The Override CSS is used to override our netDocShare default style. User can override the CSS, just by giving the URL of the CSS file. Once user provide new override CSS URL it will start loading the CSS file instead of default CSS file.
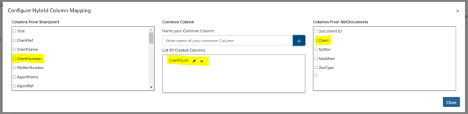
Configure Hybrid Columns Mapping: Configure Hybrid Columns Mapping will open a popup window that will let users set relationships between SharePoint and NetDocuments columns for the Hybrid results view. Since each platform may not have matching column names, this is the opportunity for the user to associate columns with different names so that the search results can have a combined column that shows results from each. For example, if you have a column in SharePoint named ClientNumber and a cabinet profile attribute in NetDocuments named ClientNum, you can use this feature to display the metadata for both under a shared tag of “Client” or whatever you choose.
- Filter Associations: Filter Associations is very similar to the above idea of Hybrid column mapping. It takes a set of values used to consolidate the search filters between SharePoint and NetDocuments search. Users can specify columns from SharePoint and NetDocuments to associate with each other under a common filter name.For example, your client column in SharePoint may be named ‘clientNumber’ and in NetDocuments, the same data column might be named “Client”. With filterAssociations, you can name a common filter, “clientNum” that refers to and will filter on both of these columns. You can also specify disconnected columns that will filter results only from one list or the other. Users can create these associations in the Config Builder or manually create them.
Example:
“filterAssociations”: [{
“Client”: [“ClientNumber”, “Client”]
}, {
“Matter”: [“MatterNumber”, “Matter”]
}, {
“Document Type”: [“”, “DocType”]
}, {
“Application Number”: [“ApplicationNumber”, “”]
}, {
“Previous File Ref”: [“PreviousFileRef”, “”]
}]
Using the filterAssociations array above will yield the following results:
- Client and Matter columns from SharePoint and NetDocuments will be consolidated into the common filters named “Client” and “Matter”. Generally, they would not be associated because the names mismatch.
- Document Type is an example of a NetDocuments-specific filter. Using this filter will further filter NetDocuments results without affecting SharePoint results
- Application Number and Previous File Ref are examples of SharePoint-only filters.
Installation Instructions
- NetDocShare Hybrid requires an additional license option. This feature will only be enabled if the licensing process detects that your key has this feature enabled. This feature is only available for enterprise level clients. If you do not have this enabled, you may encounter an “invalid license” error.
- Once the licensing has been established you will have access to a new viewtype in the config builder
- Start off by configuring a webpart, which will generate a JSON config object. You can simply save it (if using the popup config builder) OR copy to your clipboard and paste into a configuration pane of a new webpart.
- Your netDocShare Hybrid config object should look something like this:
{“viewType”: “intSearch”,”assetPath”: “your asset path”,”altAssetPath”: “an alternate asset path”,”netDocsClientId”: “AP-P0VO45CC”,”netDocsClientSecret”: “22gU18HpBw460urwyr2xMCsf”,”netDocsBaseUrl”: “https://api.vault.netvoyage.com/v2″,”CDNBaseUrl”: ” https://m365x634254.sharepoint.com/“,”AuthSuffix”: “SitePages/auth.aspx”,”mode”: “accordian”,“SPResultConfigs”: {
“listName”: “Matters”,
“subSite”: “sitetemplates/IPSite/”,
“columnProperties”: [“MatterNumber”, “ClientNumber”, “ApplicationNumber”, “PreviousFileRef”, “CountryName”, “MatterStatus”]
},
“NDResultConfigs”: {
“netDocsBaseUrl”: “https://api.vault.netvoyage.com/v2”,
“cabinetId”: “NG-6T8NGXSE”,
“clickBehavior”: “smartPreview”,
“columnProperties”: [“id”, “client”, “matter”, “modified”, “DocType”],
“contextMenu”: [“preview”, “checkin”, “checkout”, “download”, “view”, “viewNetDoc”]
},
“filtersOn”: true,
“resultsOn”: true,
“overrideCSS”: “your Override path”,
“filterAssociations”: [{
“Client”: [“ClientNumber”, “Client”]
}, {
“Matter”: [“MatterNumber”, “Matter”]
}, {
“Document Type”: [“”, “DocType”]
}, {
“Application Number”: [“ApplicationNumber”, “”]
}, {
“Previous File Ref”: [“PreviousFileRef”, “”]
}]
}
These options can be fully controlled in the config builder similar to how custom views are created for other netDocShare webparts.