Introduction
The netDocShare Sync is an add-on for SharePoint that allows Users to create sync jobs to and from NetDocuments, OneDrive and SharePoint. This document does NOT cover the extension experience in SharePoint. Instead, this document is a guide for how to use the Sync Admin Portal, which is a separate tool that can be used to manage, create, delete, and update sync jobs all in one location.
The netDocShare Sync Admin tool is available at:
For Users that do not want to connect to an outside service, we also offer a Desktop Admin App which can be installed locally.
NOTE: Any changes that happen, for example, Metadata changes, permissions, renaming folders or renaming files, and deleting/creating new files are immediately synced in SharePoint, NetDocuments and OneDrive.
Note- Checkout Files are not synced if user checked out the files on SharePoint or NetDocuments
Admin Users can create the following sync job types in the netDocShare Sync Admin Portal.
- SharePoint to NetDocuments
- NetDocuments to SharePoint
- Bi-Directional (SharePoint – NetDocuments)
- OneDrive to NetDocuments
- NetDocuments to OneDrive
- Bi-Directional (OneDrive – NetDocuments)
Authentication
Admin Users can access the Admin App by entering a Valid License key on the first screen. Once the license is verified, Users will be prompted by a second layer of security to login to their NetDocuments account. If Single-Sign On is configured on the tenant, this should automatically login, otherwise Users will be presented with the standard NetDocuments login screen. Once NetDocuments login is verified, Users will be able to access the Admin Sync portal.
Connection Settings
Before creating any sync jobs, the Admin must add the SharePoint Connection settings and OneDrive Connection settings.
Users will not be able to create new sync jobs if Connection settings are not created.
SharePoint Connection Settings
Once you have successfully entered the netDocShare Sync Admin interface, note the options that exist on the left side panel.
Start by clicking on the SharePoint icon and clicking the + Add button on the far right.
A SharePoint Connection Popup screen will display.
The following Connection settings should be available:
- Online (Default selection)
- On-Premises
The following fields and buttons are displayed in the online SharePoint Connection settings screen:
- Site Address
- Client ID
- Client Secret
- Connect and Cancel button

Once User has entered the Site Address, Client Id and Client Secret, the User clicks on the Connect button.
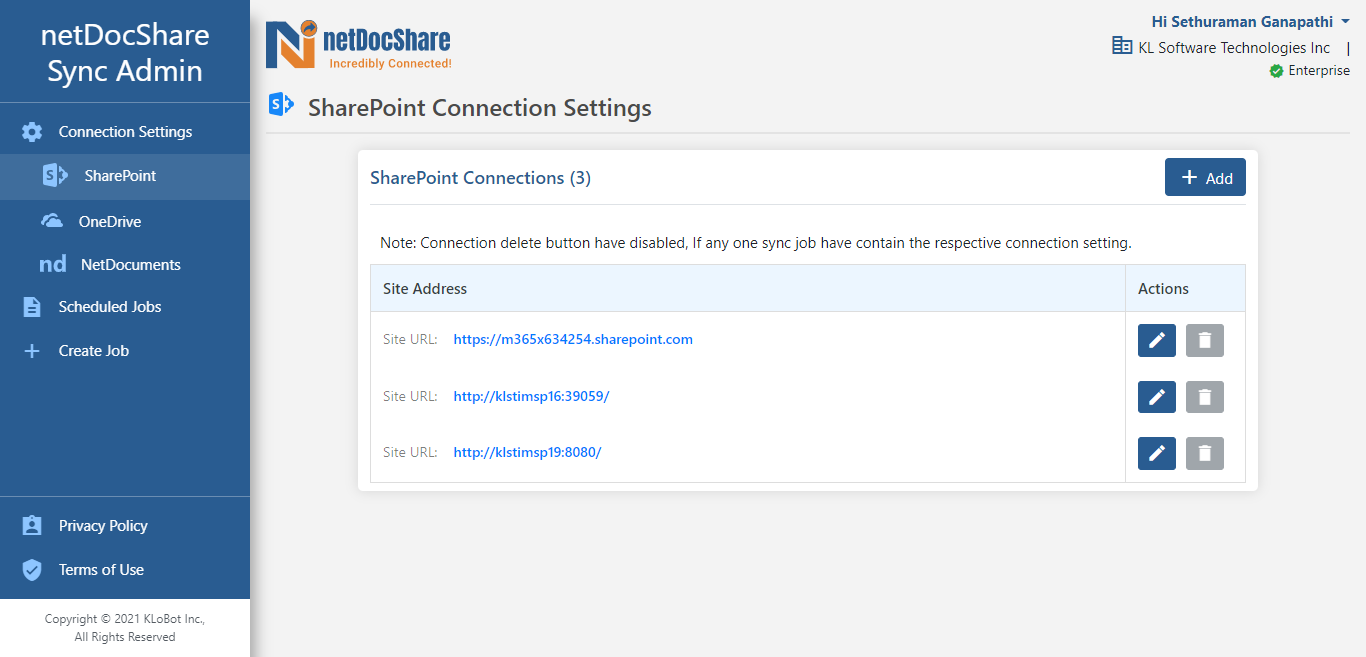
If there no errors are encountered, the SharePoint Connection settings have been added successfully. The added connection settings are displayed under the SharePoint Connection settings.
Users can later Edit or Delete the SharePoint connection settings if desired. However, the Delete button will appear disabled if any User has created one or more sync jobs for the respective connection setting.
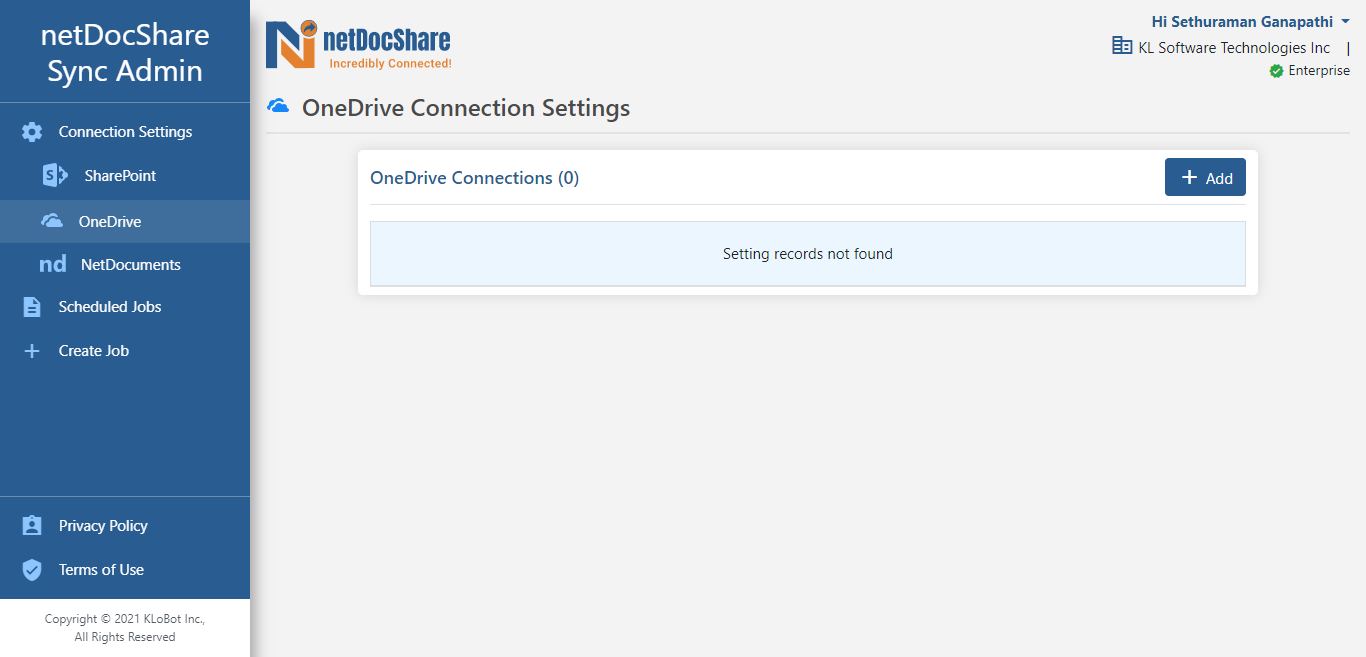
OneDrive Connection Settings
Like the SharePoint connection settings OneDrive connection settings page can be reached from the left side panel. Start by clicking the + Add button on the far right.
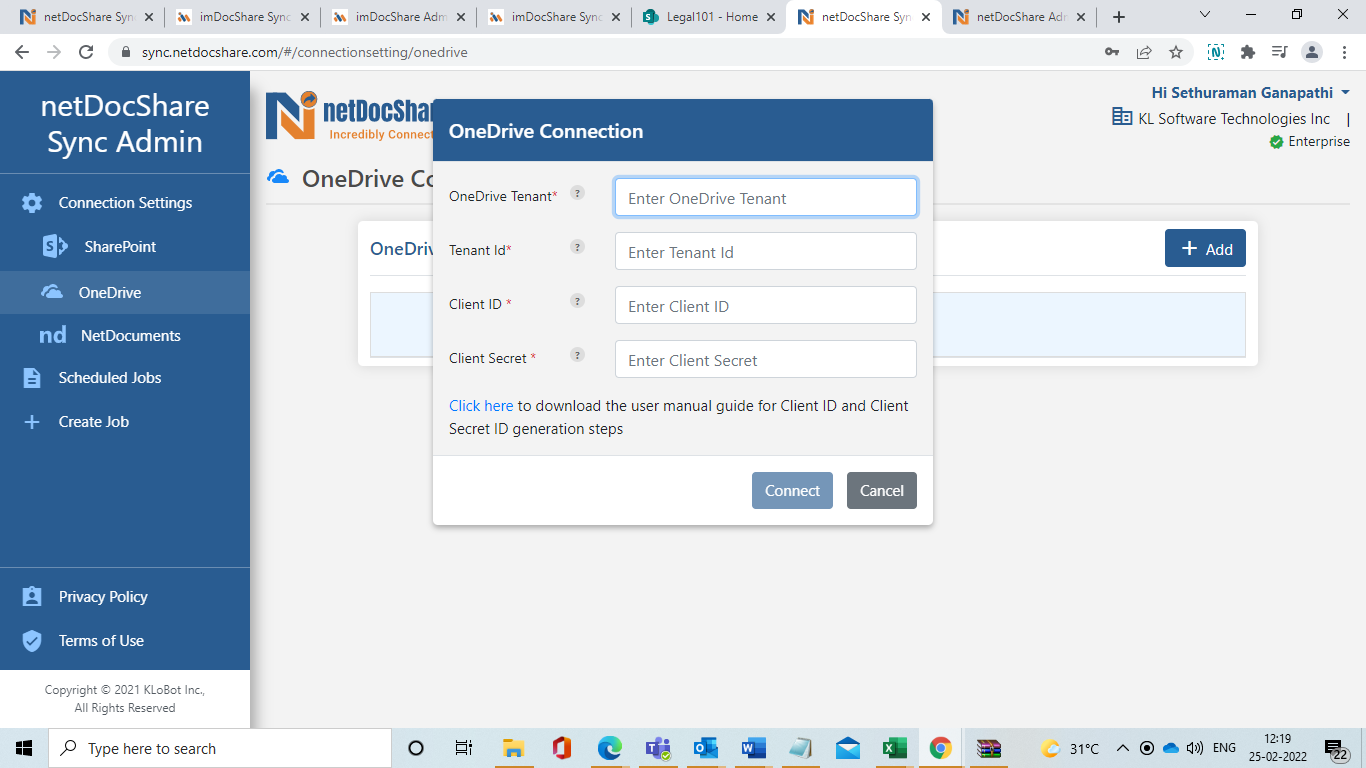
The OneDrive Connection popup screen will be displayed.
The following fields and buttons are displayed in the OneDrive Connection popup screen:
- OneDrive Tenant
- Tenant Id
- Client ID
- Client Secret
- Connect and Cancel buttons
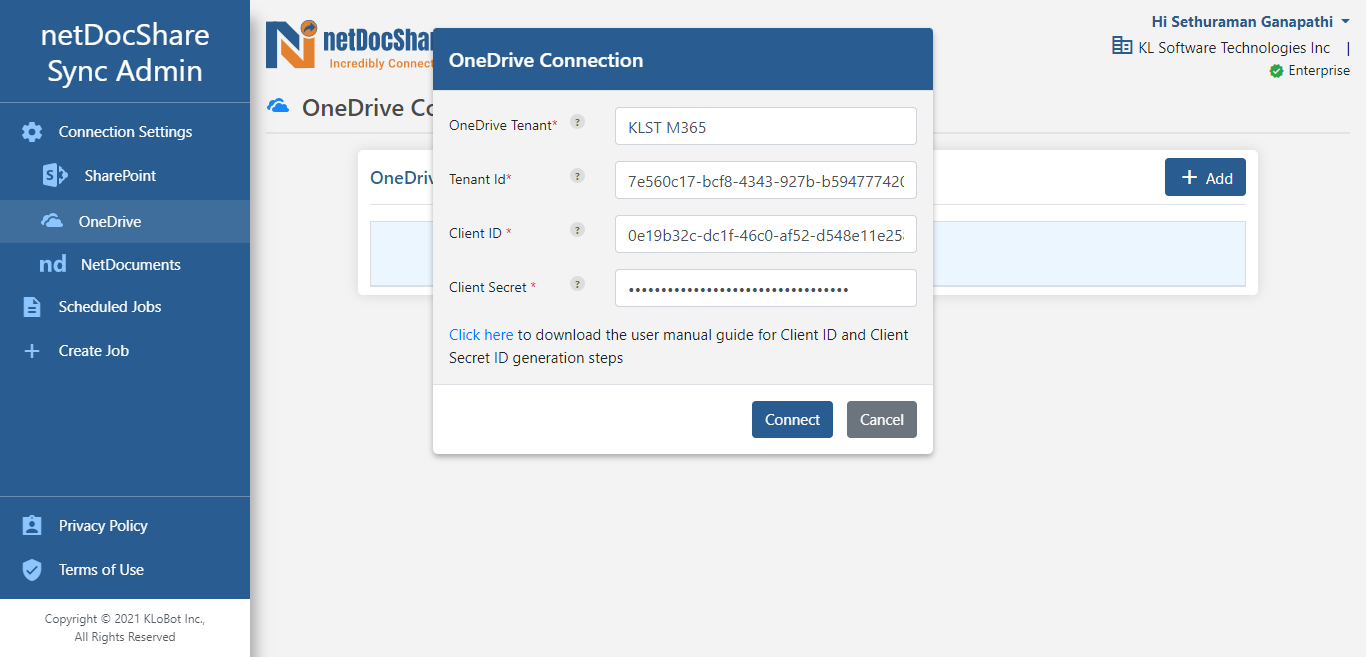
Fill out the fields and click the Connect button to verify your connection.
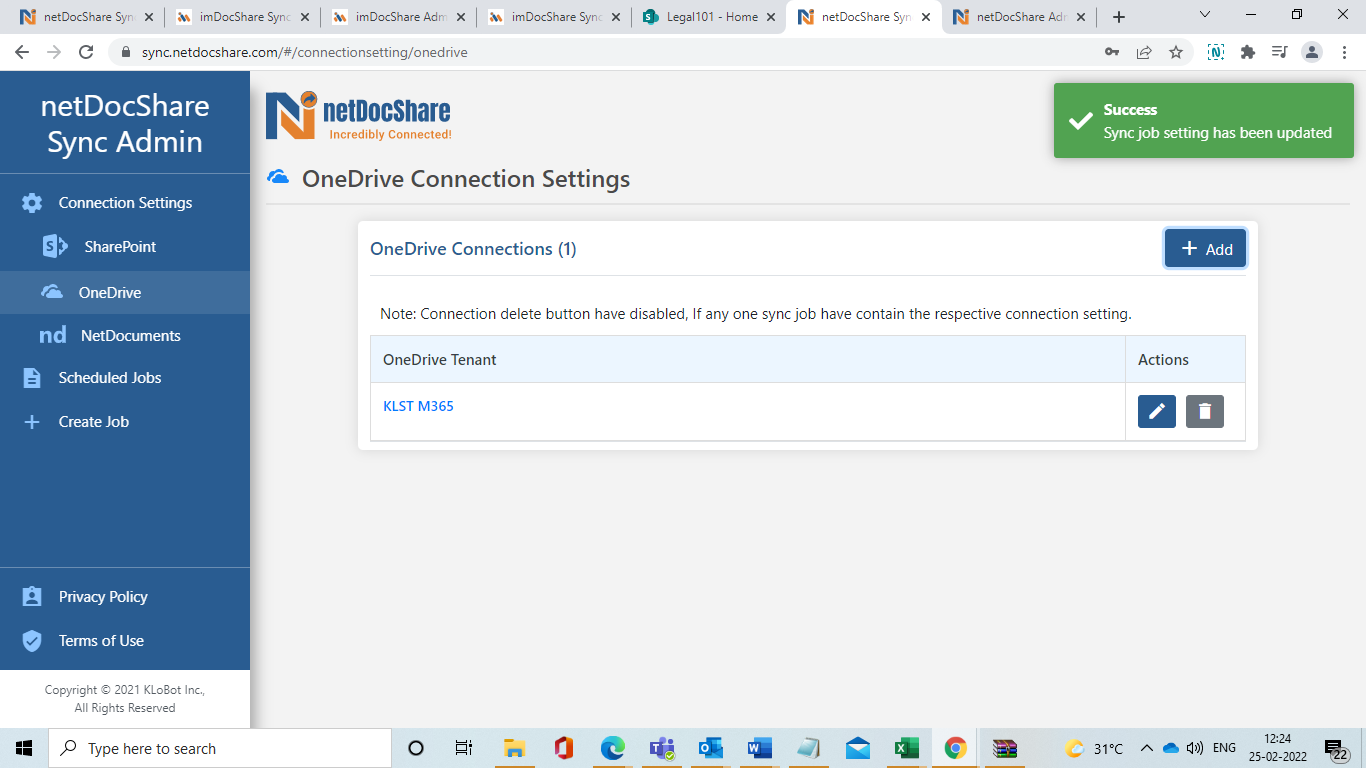
If there are no errors encountered, the OneDrive Connection settings have been added successfully and added connection settings are displayed under OneDrive Connection settings.
Users can later Edit or Delete the OneDrive connection settings if desired. However, the Delete button will appear disabled if any User has created one or more sync jobs for the respective connection setting.
Sync: SharePoint to NetDocuments
netDocShare sync application can be used to sync files and folders between NetDocuments and SharePoint.
Any changes that happen, for example, Metadata changes, permissions, renaming folders or renaming files, deleting/creating new files are immediately synced in the SharePoint, NetDocuments and OneDrive and that happens in real-time.
Users can create the following sync job types in netDocShare Sync Admin Portal:
- SharePoint to NetDocuments
- NetDocuments to SharePoint
- Bi-Directional (SharePoint – NetDocuments)
To start, click “Create Job” on the left side panel.
The Create Job Page will be displayed.
The following fields are displayed on the Create job page:
- Sync Type- Default is selected as SharePoint to NetDocuments.
- Copy Metadata Columns- This option allows Users to automatically copy metadata columns and data from one platform into the other.
- Apply Permissions
– This allows Users to apply the same permissions that exist from one platform to the other. - Move File – An option that is only applicable for SharePoint to NetDocuments use cases. This option will MOVE a document permanently from SharePoint to NetDocuments. It will leave behind a file that references its new location but the file itself will be completely removed from SharePoint and uploaded to your selected NetDocuments location.
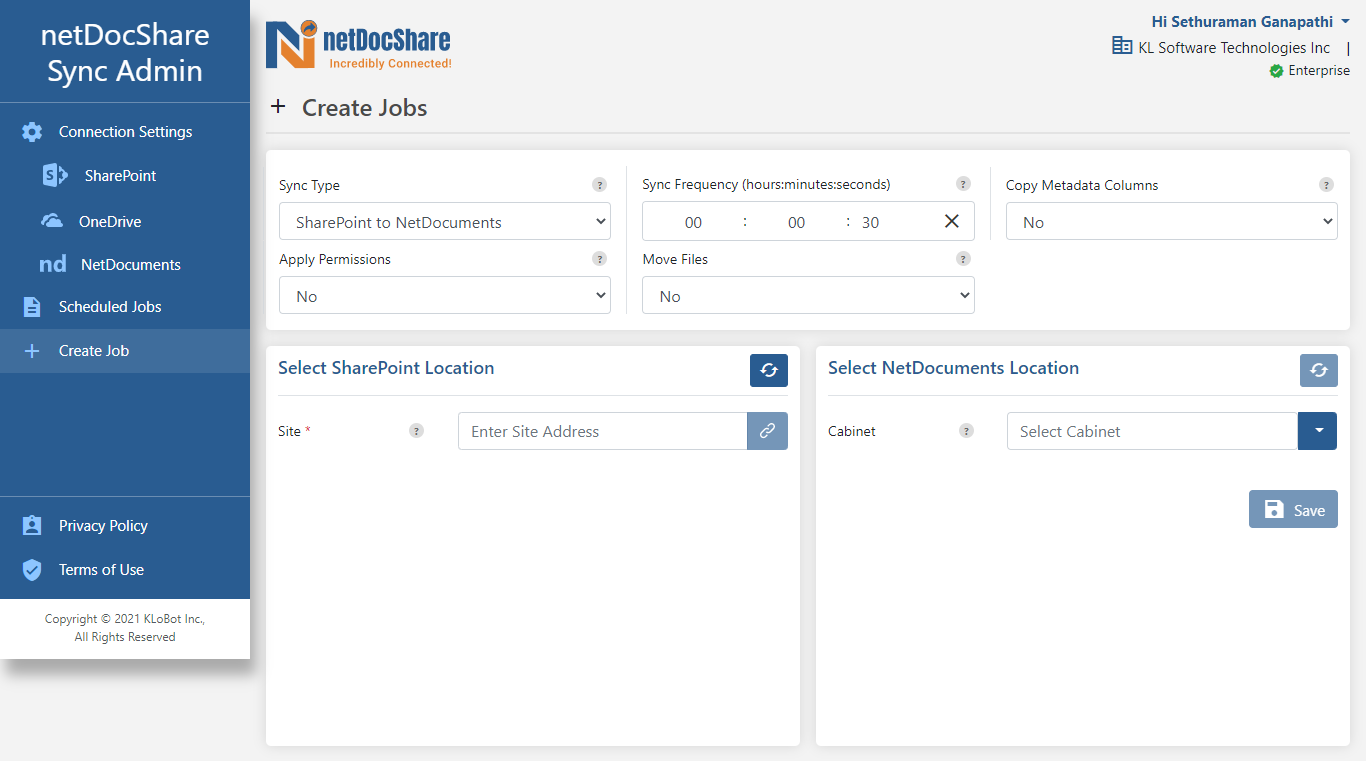
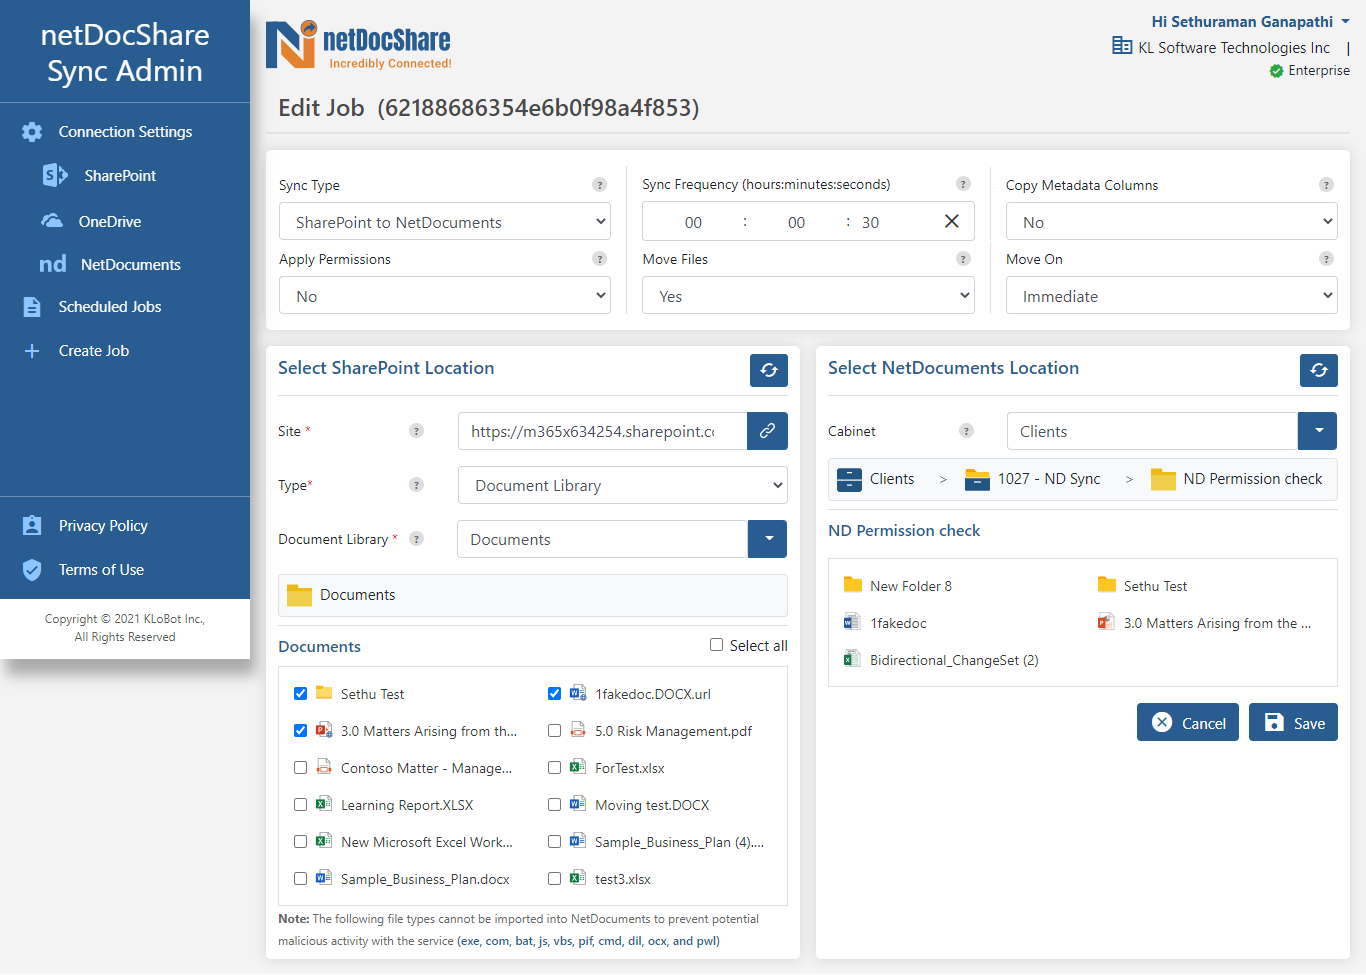
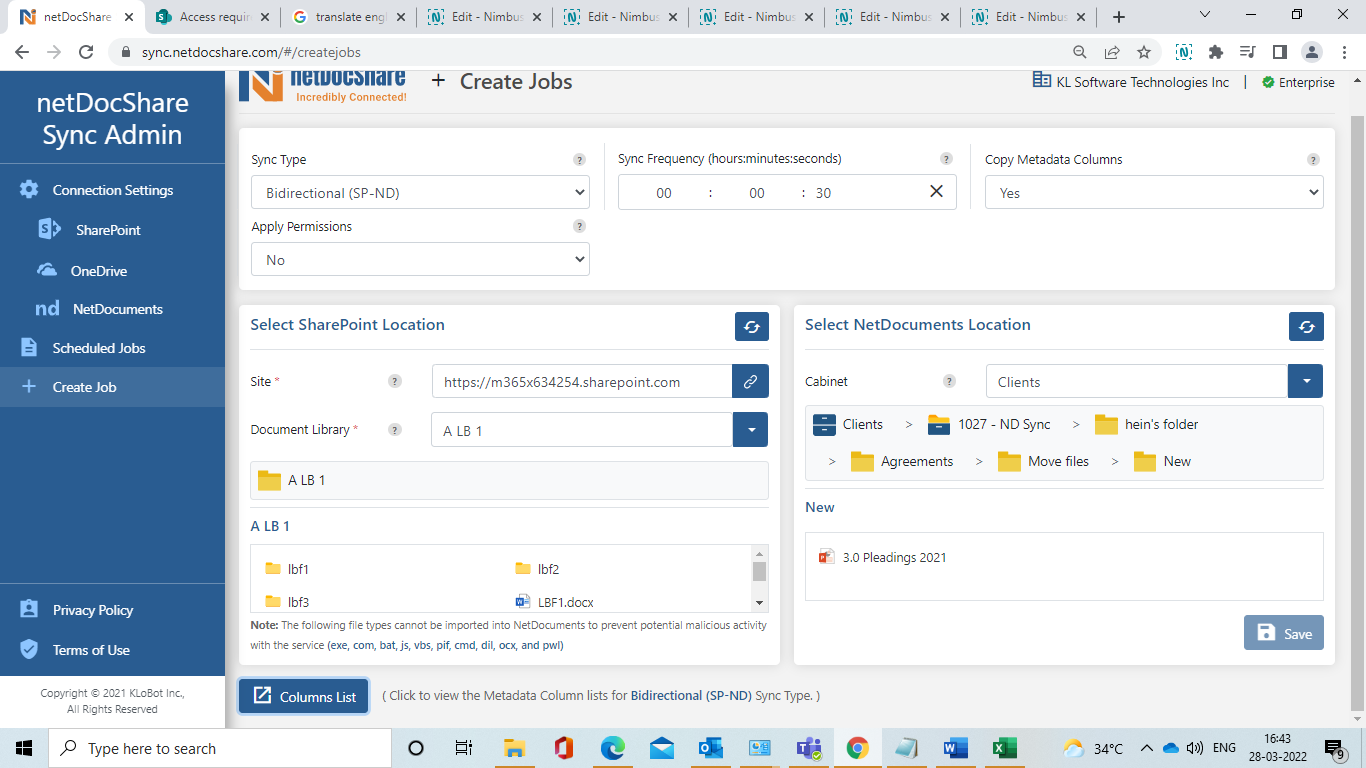
Select the Sync Type as SharePoint to NetDocuments and Copy Metadata Columns as “No” and Apply Permissions as “No” and Move File as “No”.
Enter the Site Connection and click the Connect icon under the SharePoint Connection section.
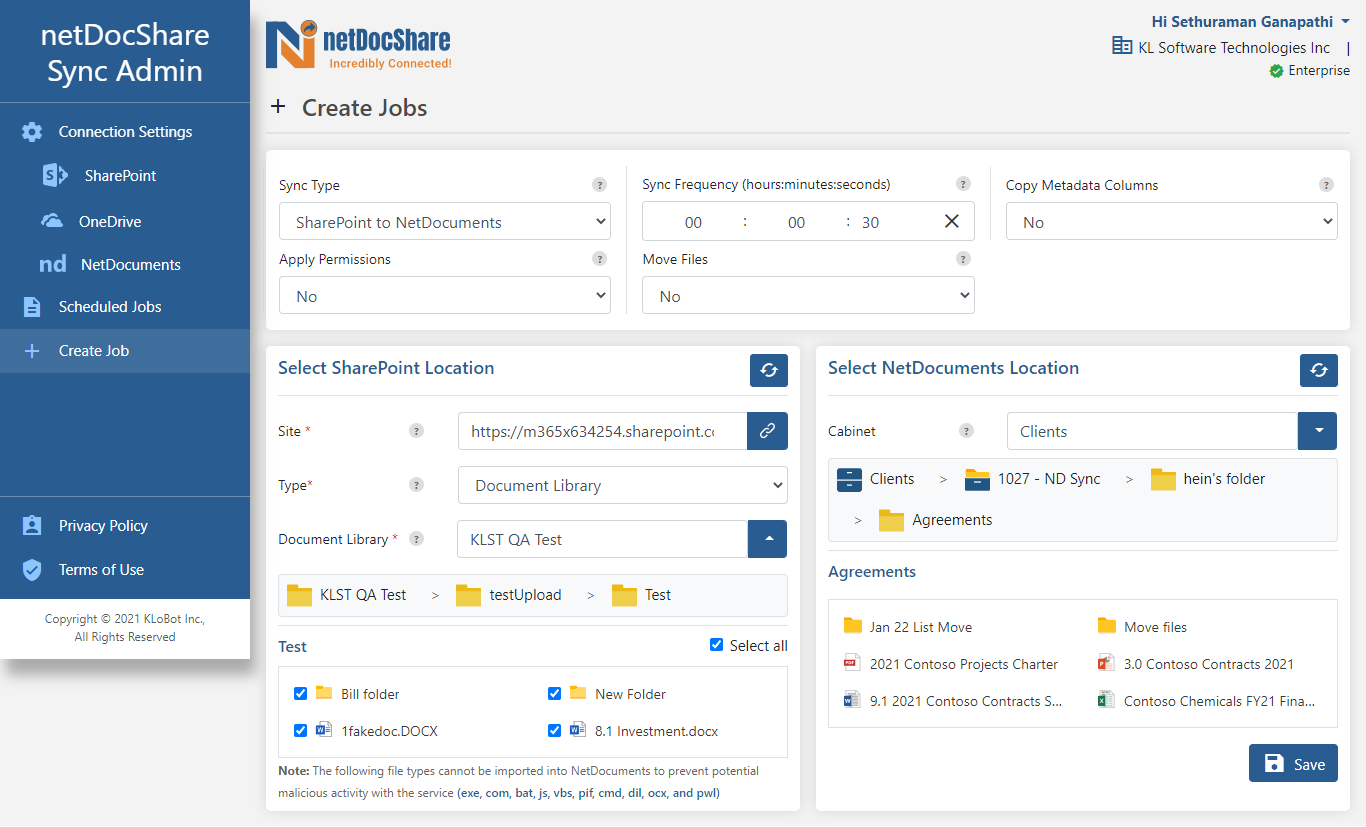
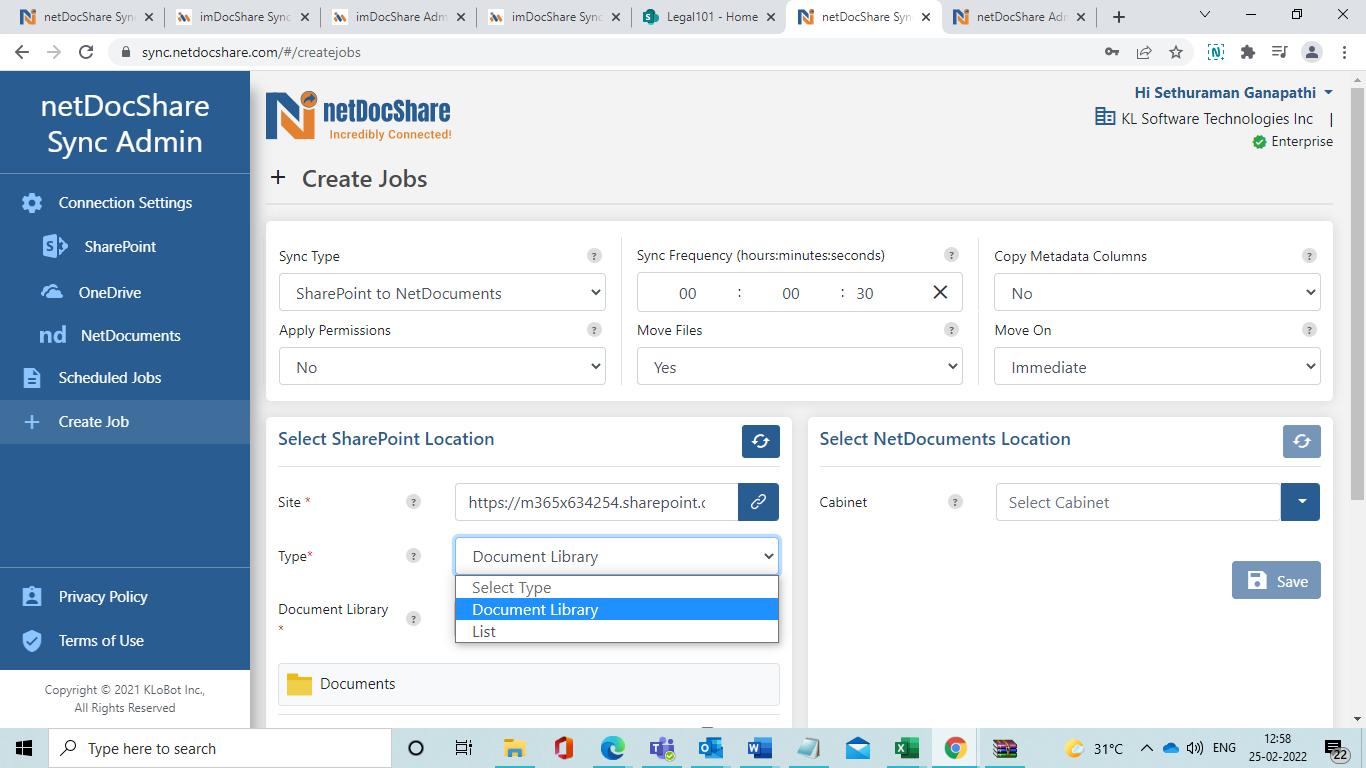
Type and Document Library fields are displayed once Users can connect successfully.
Select the Type as Documents Library and Select the Document Library that you wish to sync documents from.
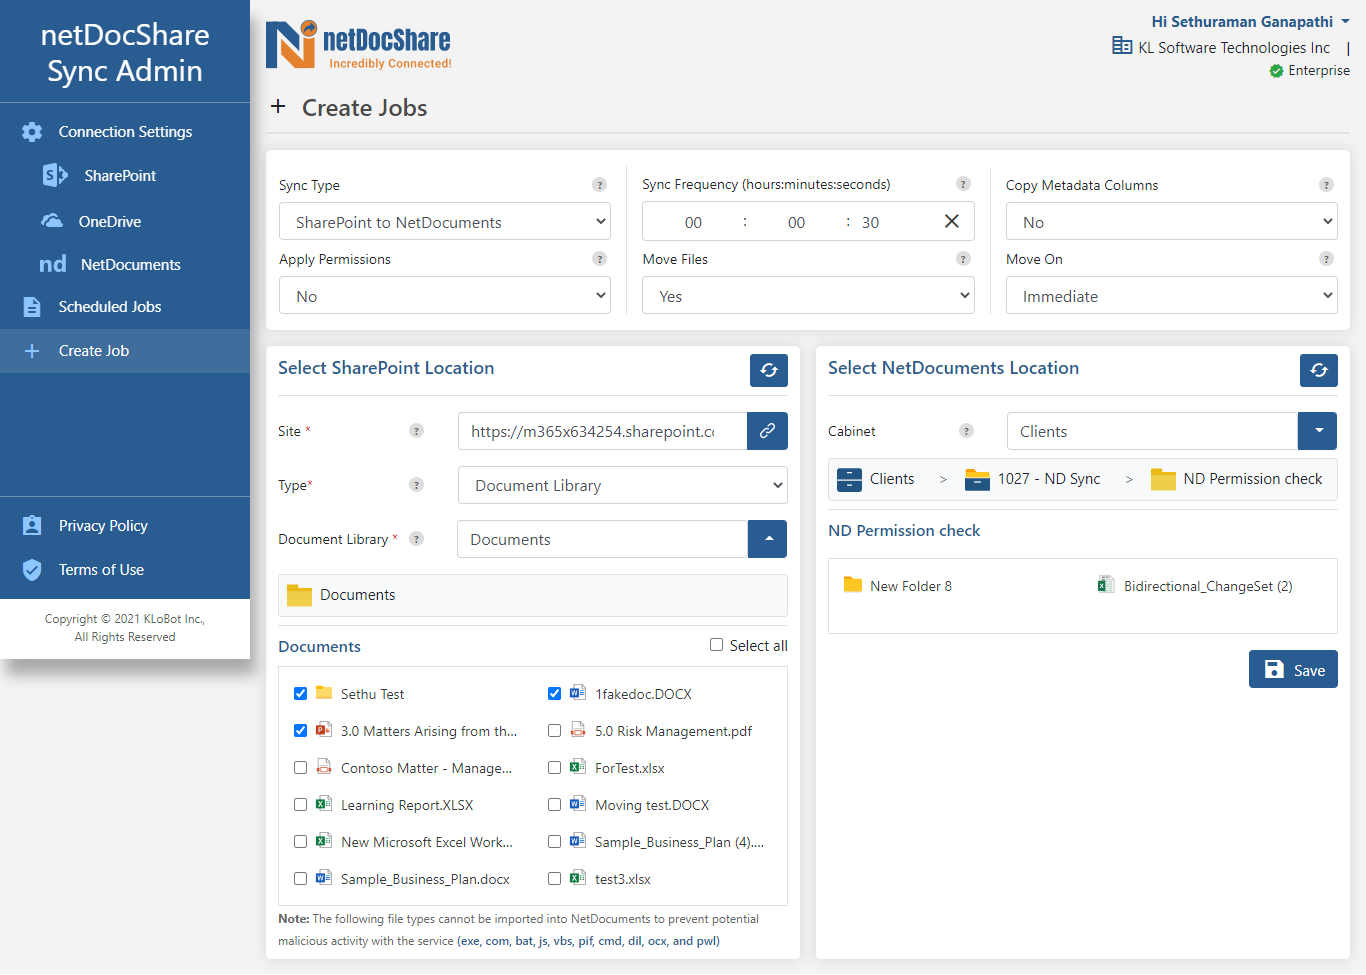
The relevant Documents library folders and documents are automatically retrieved from your tenant and displayed under the SharePoint section.
Users can select any combination of folders, files or select all of them to sync.
Under the NetDocuments section on the right, Users will select the NetDocuments destination where they would like the content to be migrated starting with the Cabinet and then Folders or Workspaces.
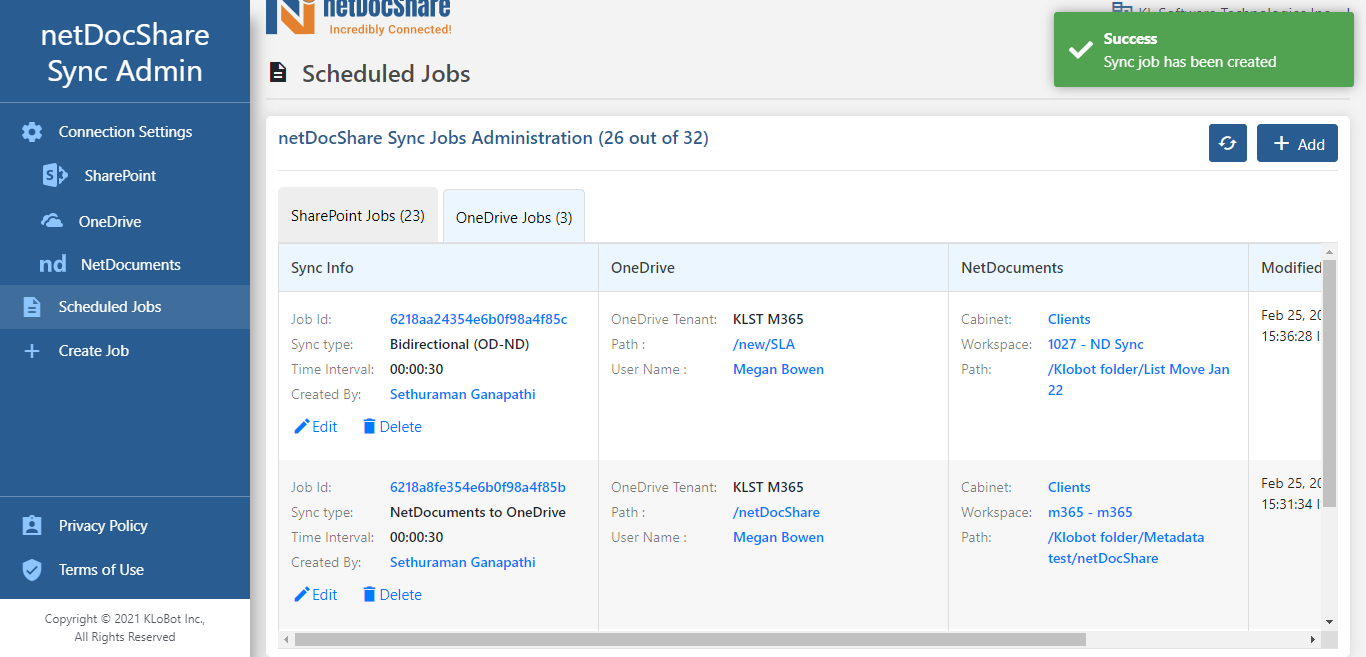
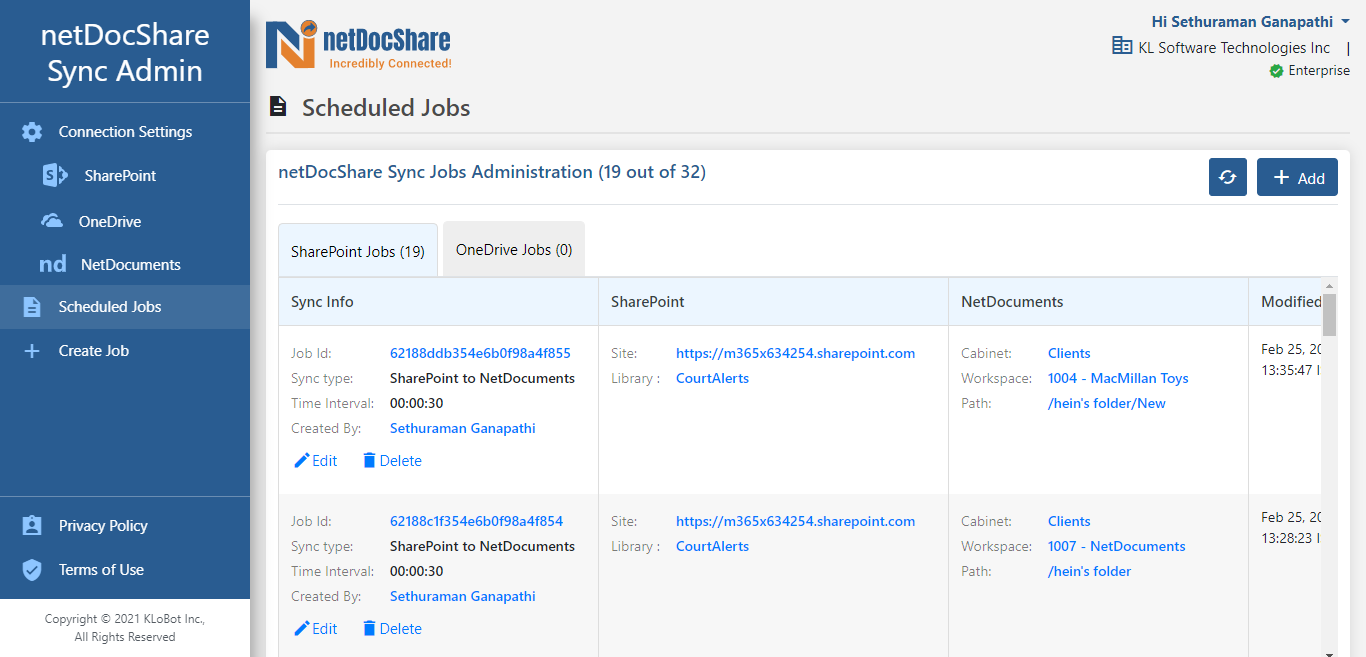
Click Save and now you have created your first sync job!
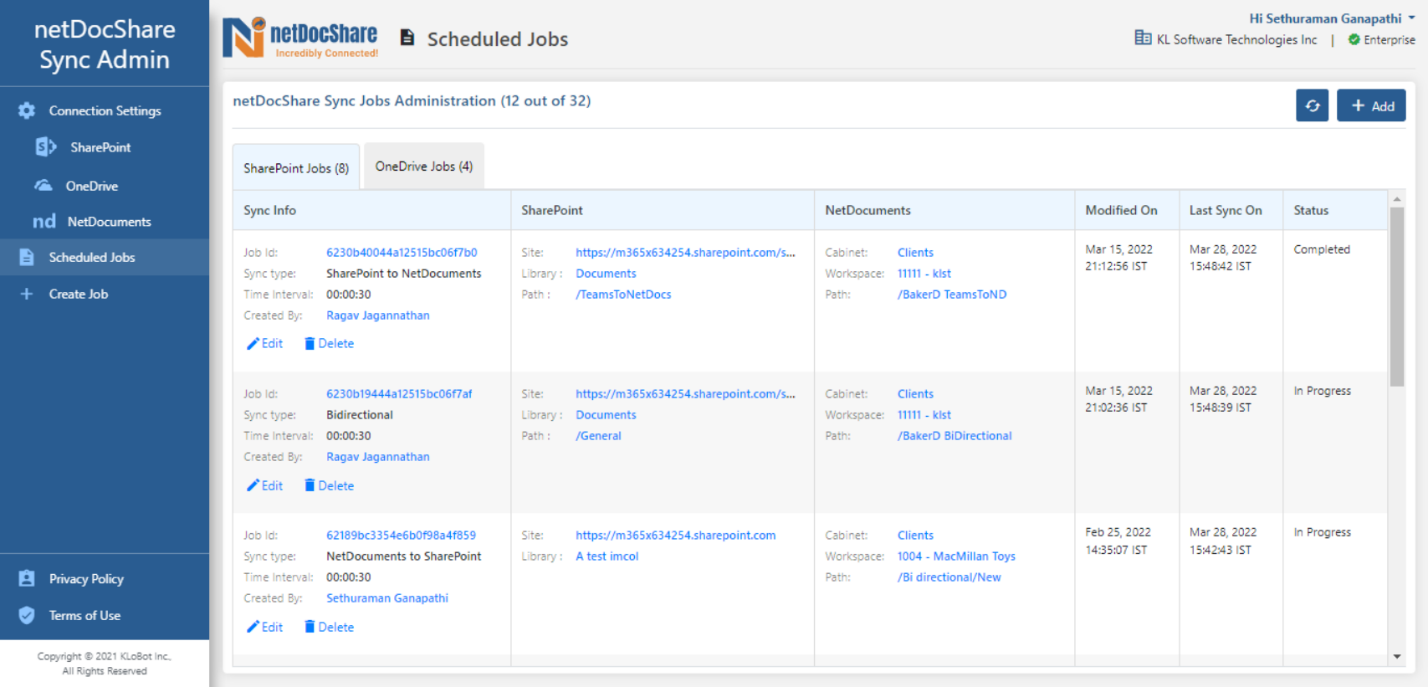
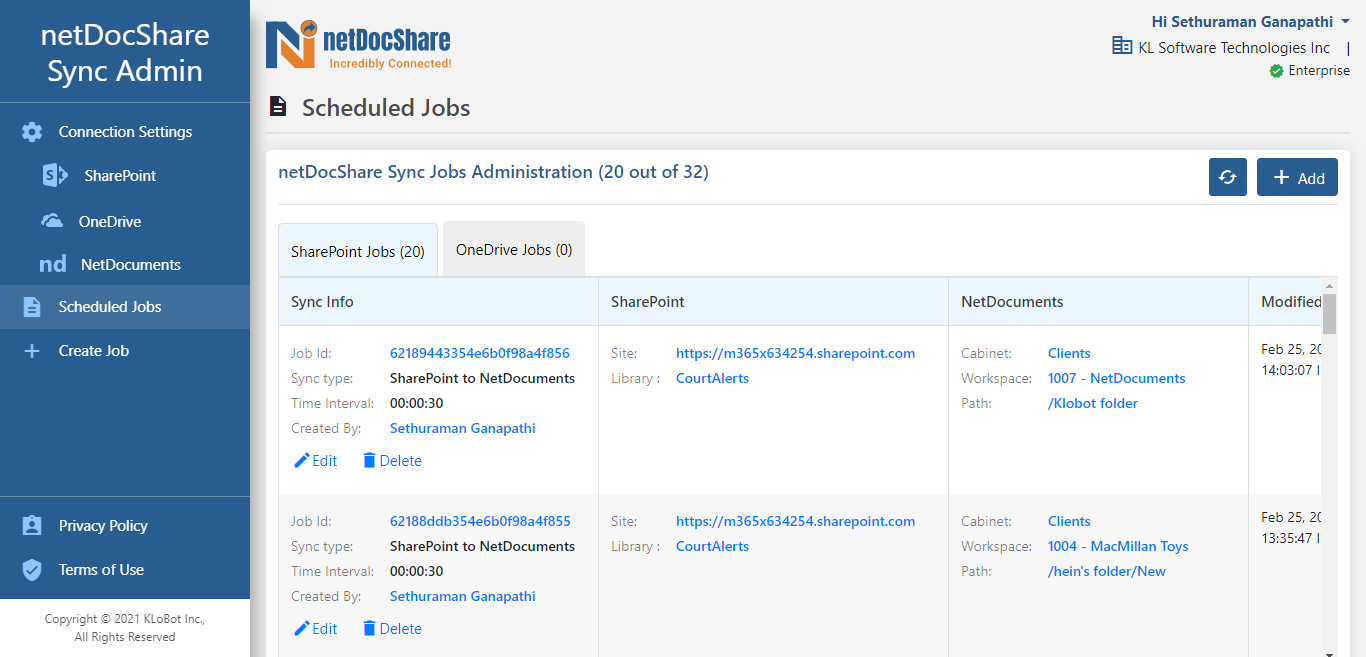
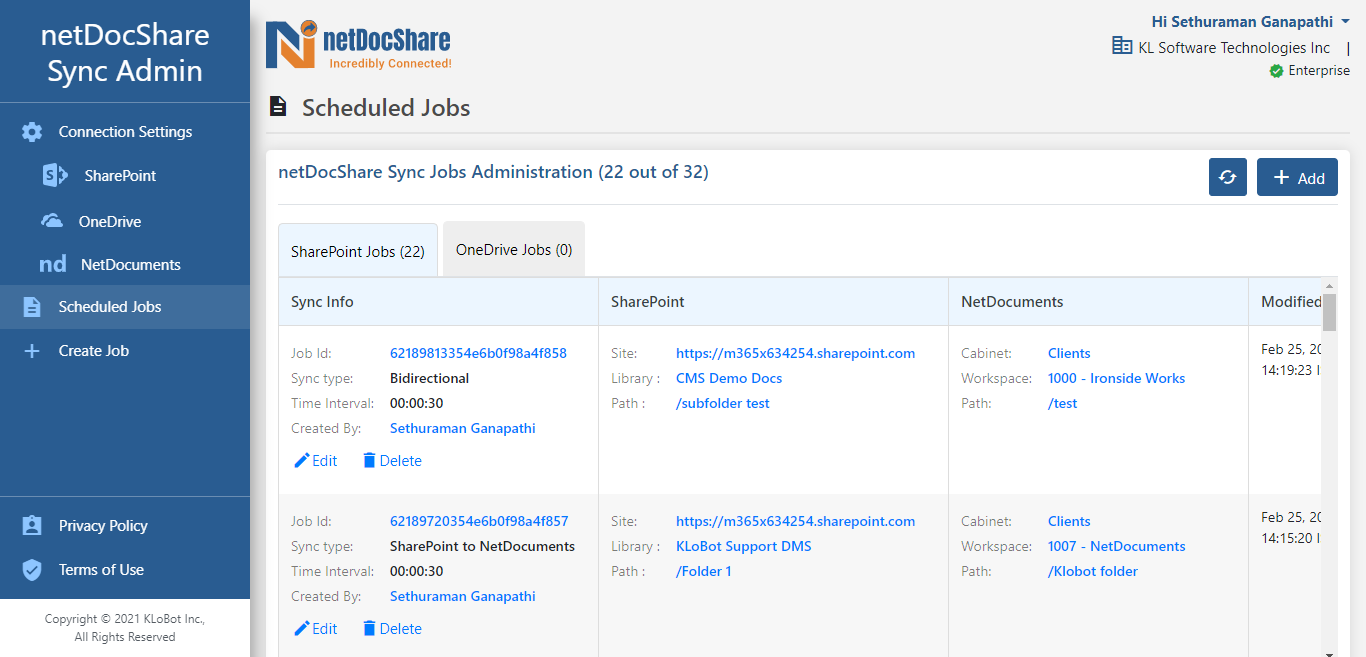
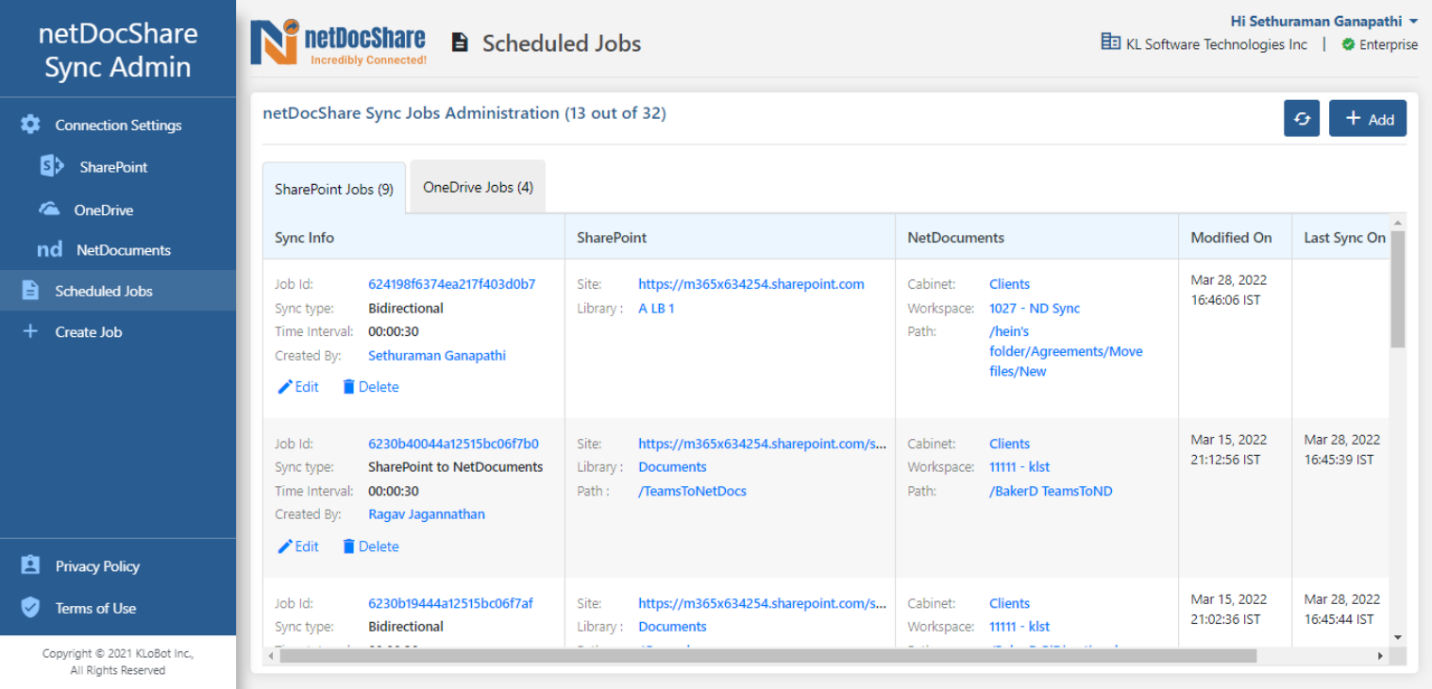
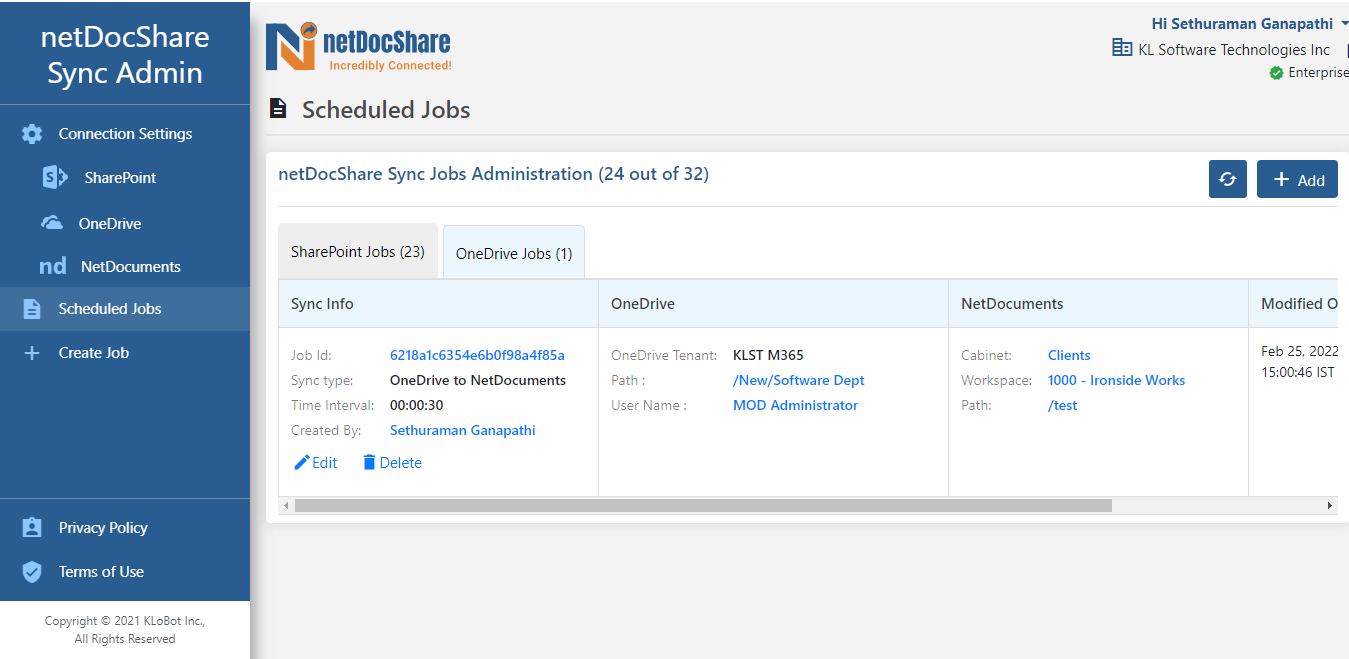
Once the Sync job is created, and a Success message is displayed, the page should redirect to the Scheduled Job screen where the admin user can create, edit, and delete existing jobs.
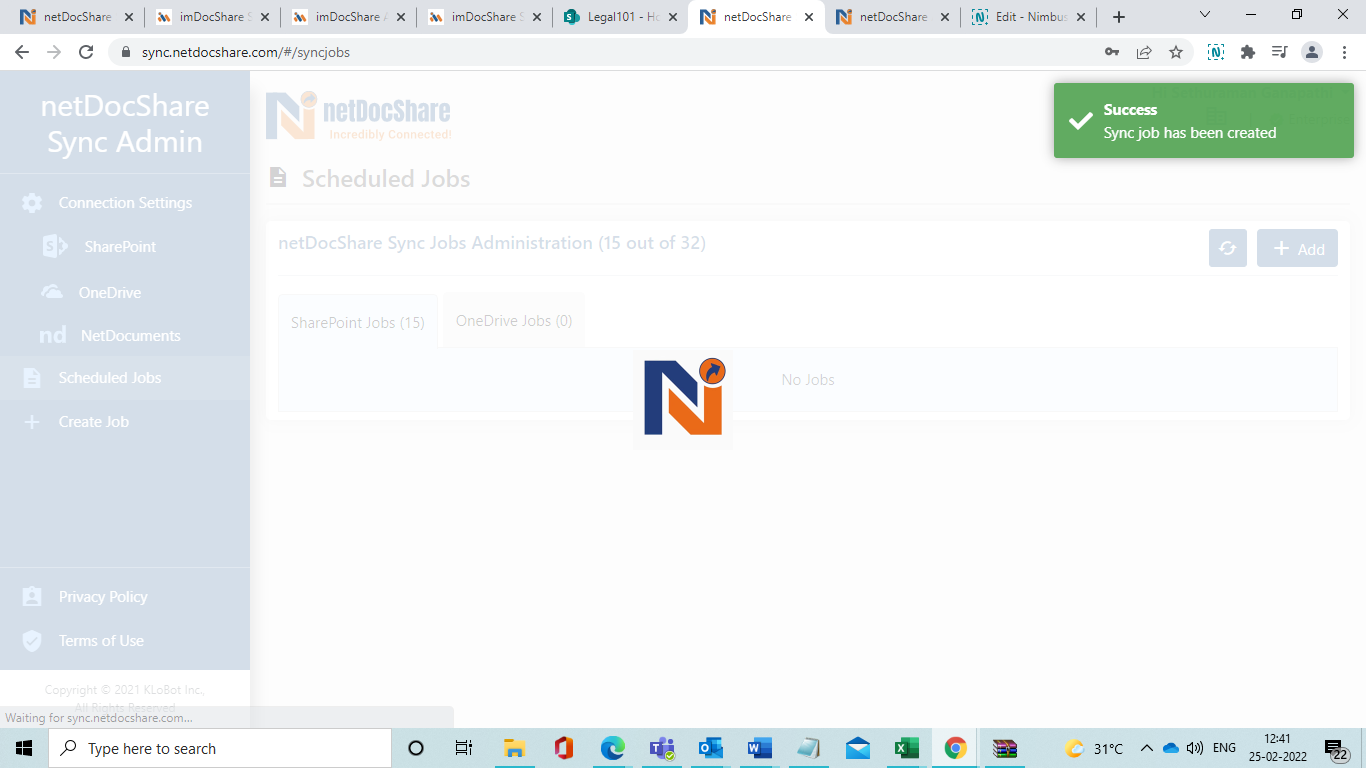
Your newly created Sync Job should now be displayed under the Scheduled Job page.
All the selected files and folders have synced SharePoint to NetDocuments.
Users will be able to update the Delete the Created job.

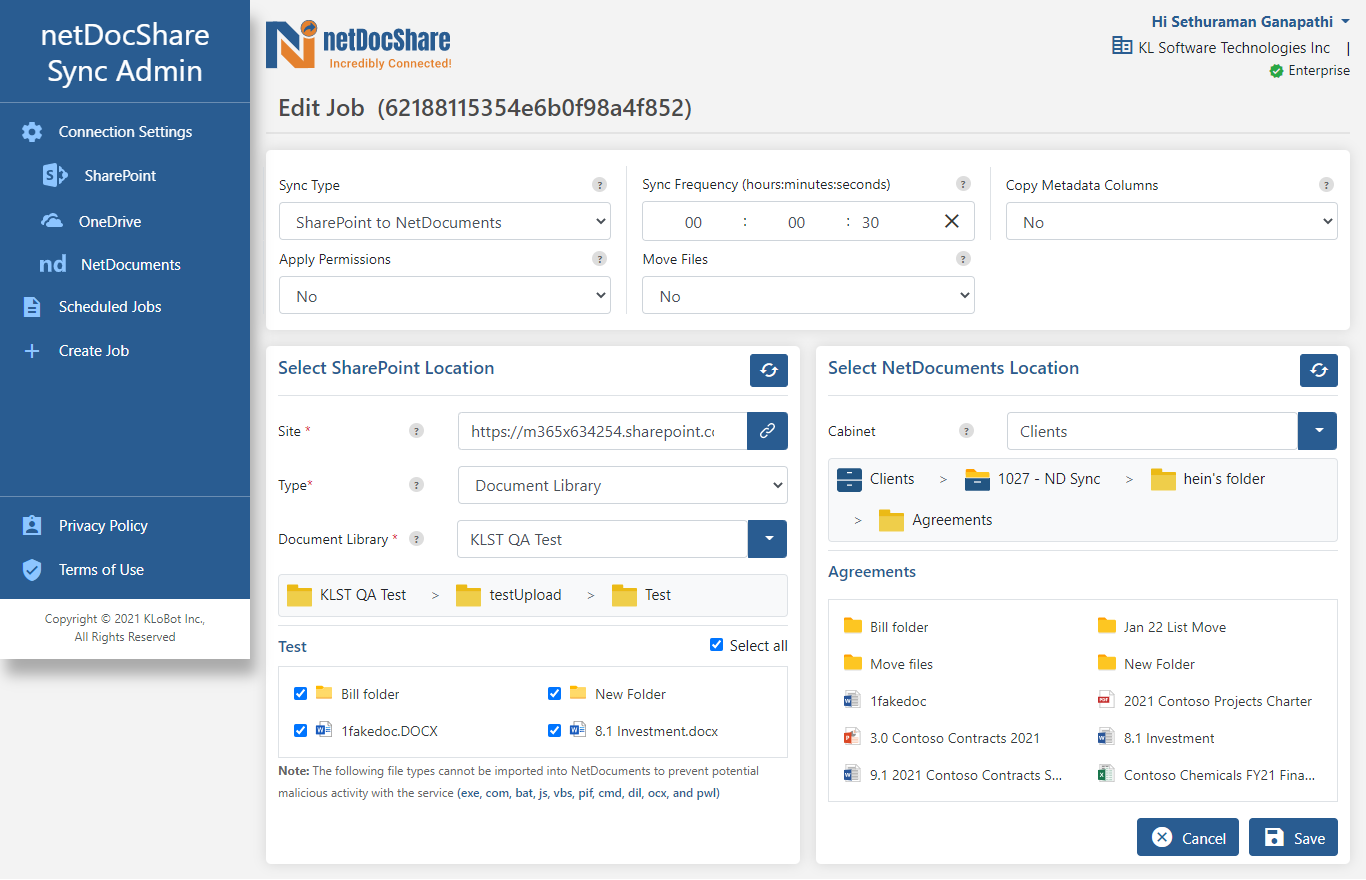
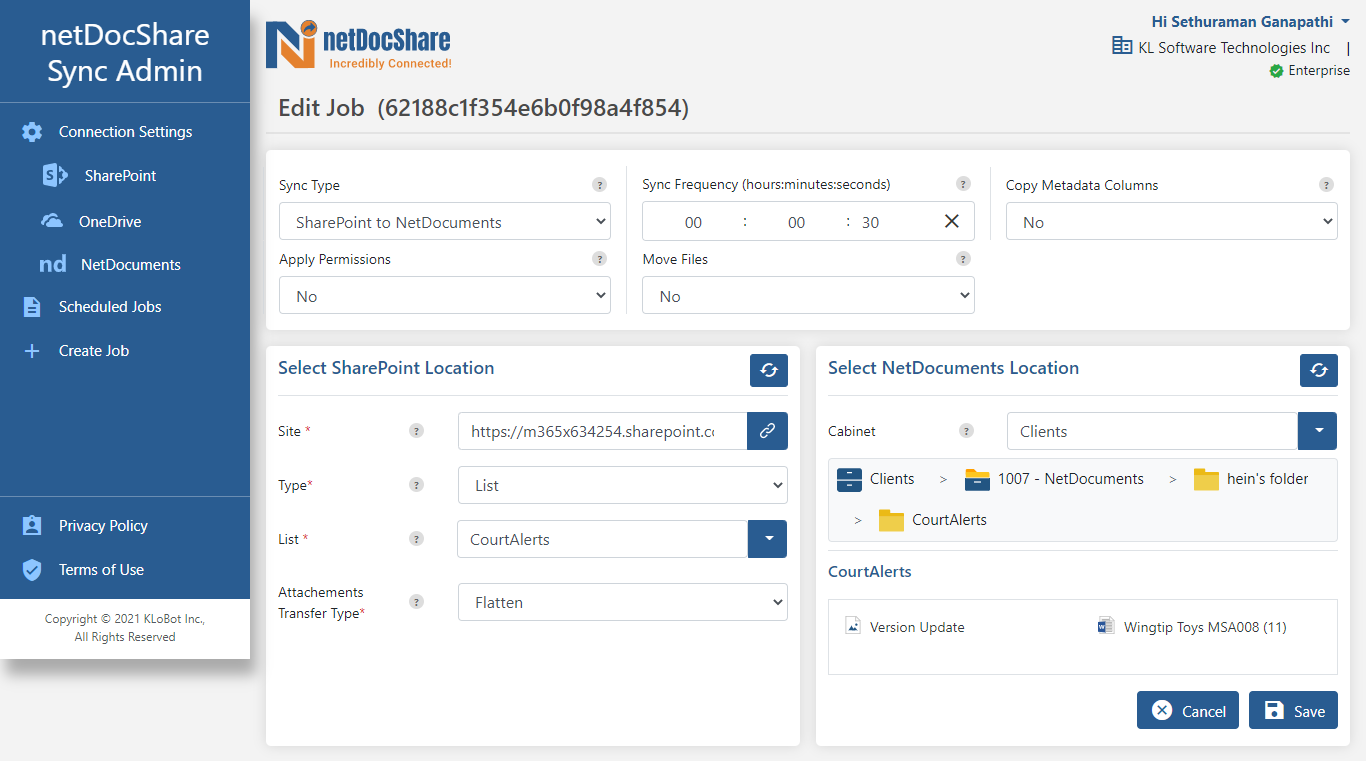
Click the Job Id or Edit on created jobs to change any of the parameters you have set previously.
Move File: SharePoint to NetDocuments
The Move File functionality is applicable for the SharePoint to NetDocuments Sync Type only.
All the Files and Folders are removed from SharePoint and uploaded to NetDocuments. Moved Files will leave behind an artifact that can help you find them in case you lose them. They should leave behind a URL file which will point to the destination that they have been uploaded to, in NetDocuments.
Move File Job Creation Steps
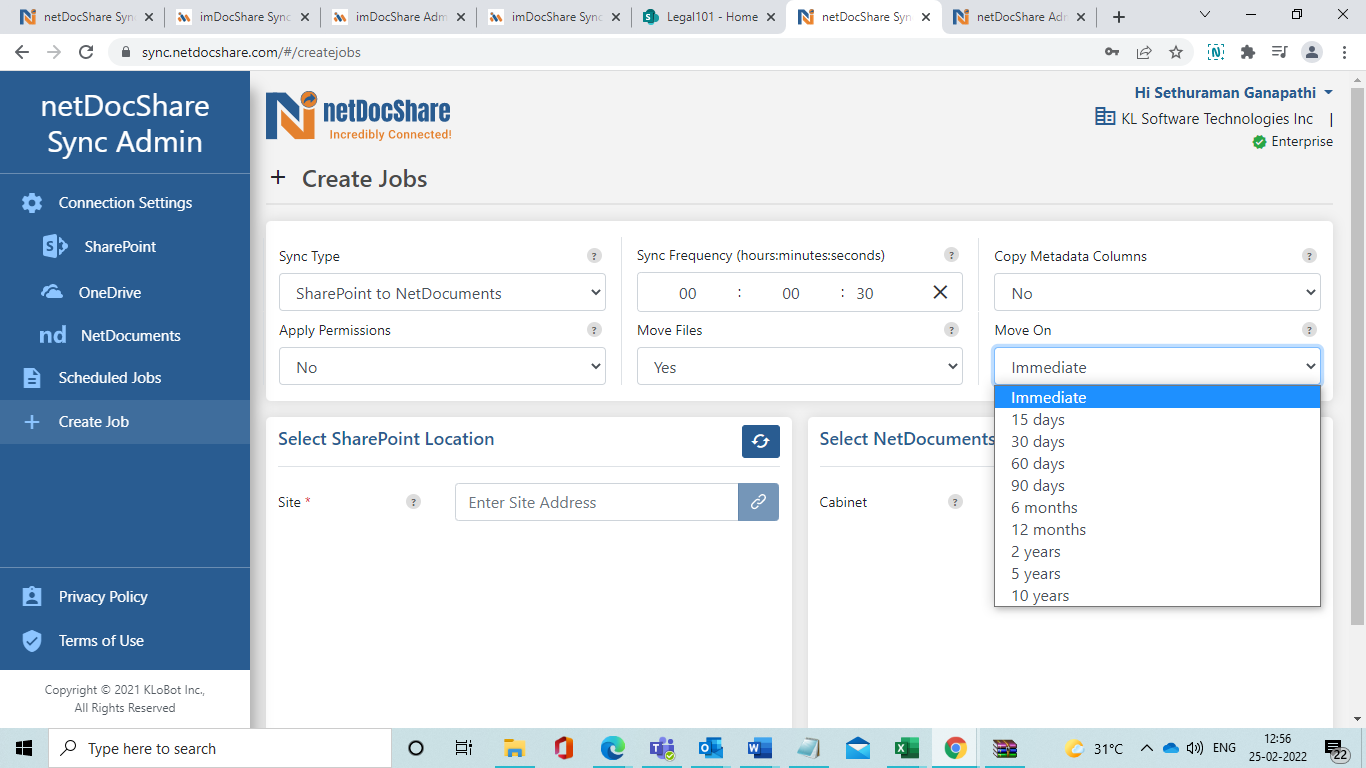
Select the Sync Type as SharePoint to NetDocuments and Copy Metadata Columns as “No” and Apply Permissions as “No” and Move File as “Yes” and select when you would like the move to occur in the Move On option.
As before, Users must enter the Site Connection and Click Connect icon under the SharePoint Connection section on the left side.
Type and Document Library fields are displayed once Users enter a valid Site URL and successfully connect to it.
Select Type as Documents Library and Select the Document Library that you wish to move content from.
The relevant Documents Library folders and documents are automatically retrieved from your tenant and displayed under the SharePoint section.
Users can select any combination of folders, files or select all of them to sync.
Under the NetDocuments section on the right, Users will select the NetDocuments destination where they would like the content to be migrated starting with the Cabinet and then Folders or Workspaces.
Click Save and now you have created your first Move job!
Your newly created job should now be displayed under the scheduled job page.
WARNING: All the selected files and folders are permanently moved from the SharePoint location to the NetDocuments location.
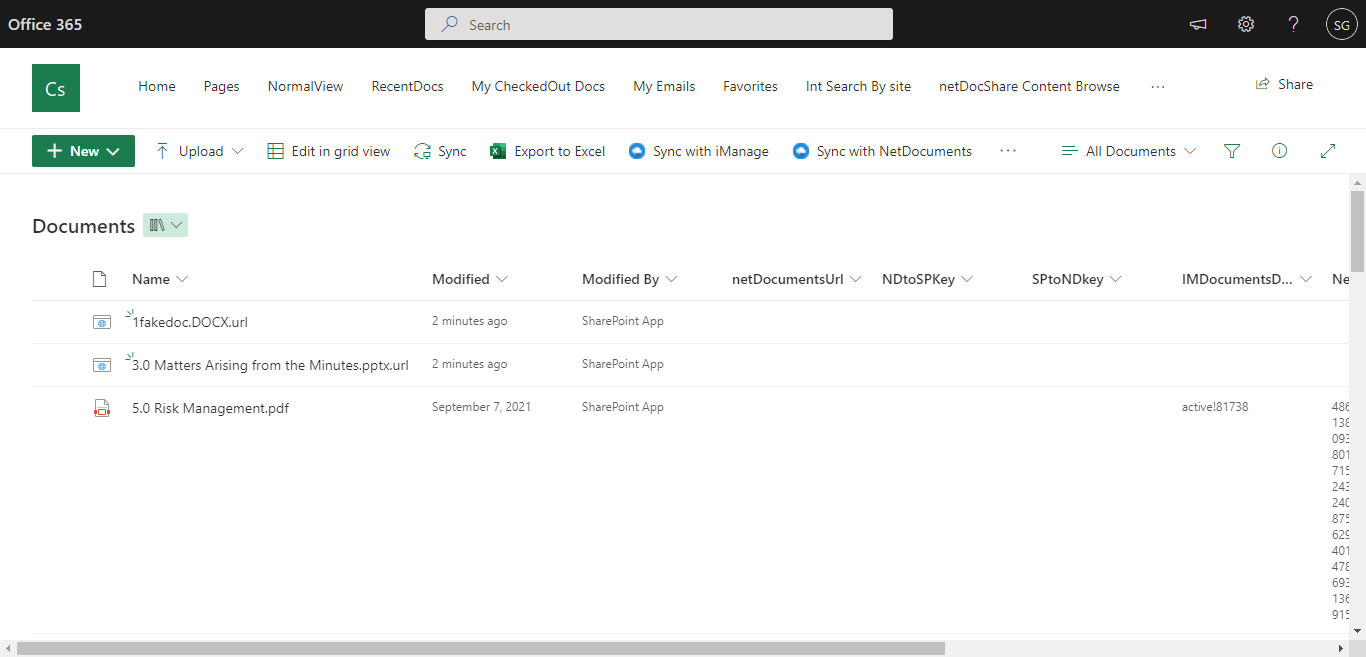
To help you find your documents in case you lost them, we have left behind artifacts for each document which will display the URL of the document’s destination in NetDocuments. See an example below. These artifacts can be deleted safely without any unexpected side effects.
List Sync: SharePoint to NetDocuments (Flatten)
netDocShare Sync application uses the SharePoint List Attachments files between the SharePoint List to NetDocuments.
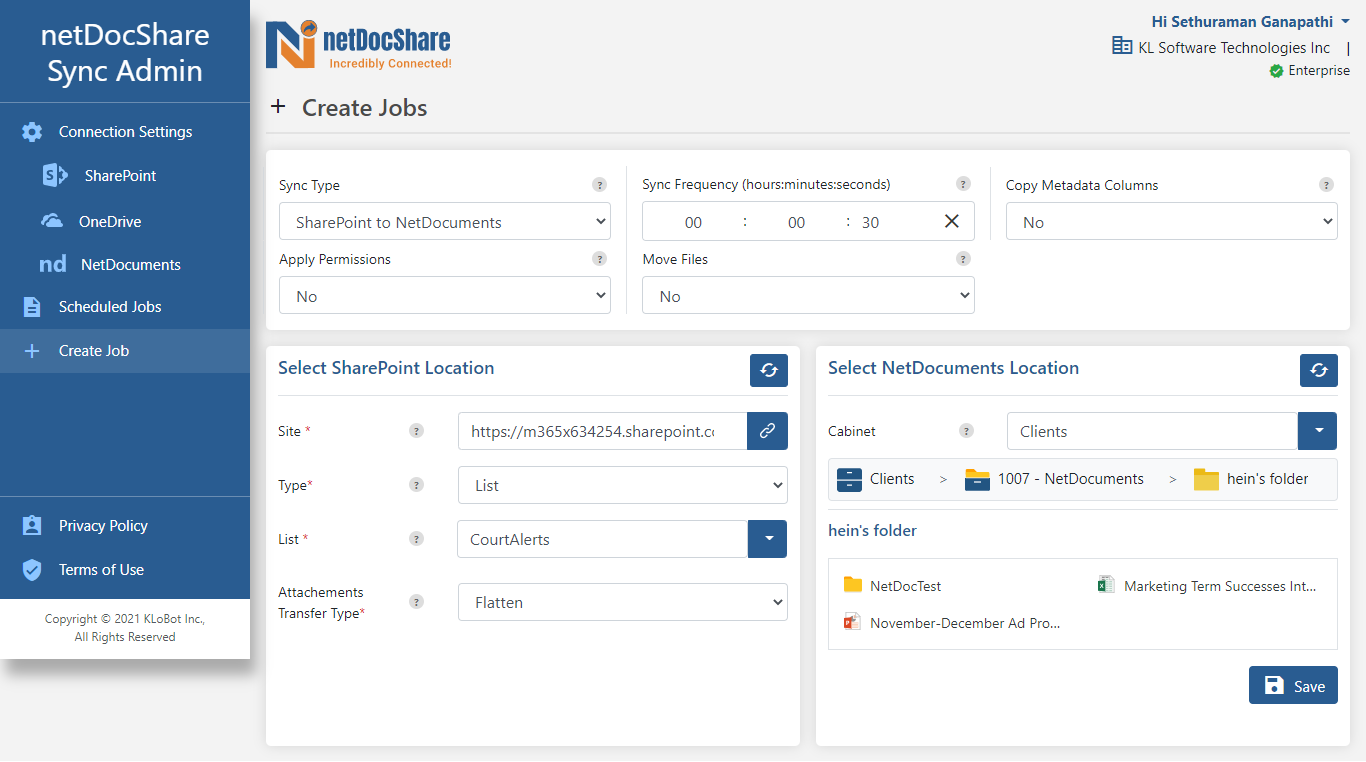
Select Sync Job Type as SharePoint to NetDocuments.
User then clicks Create Job.
The Create Job Page is then displayed.
The following fields are displayed on the Create Job page
- Sync Type- Default selected as SharePoint to NetDocuments
- Copy Metadata Columns
- Apply Permissions
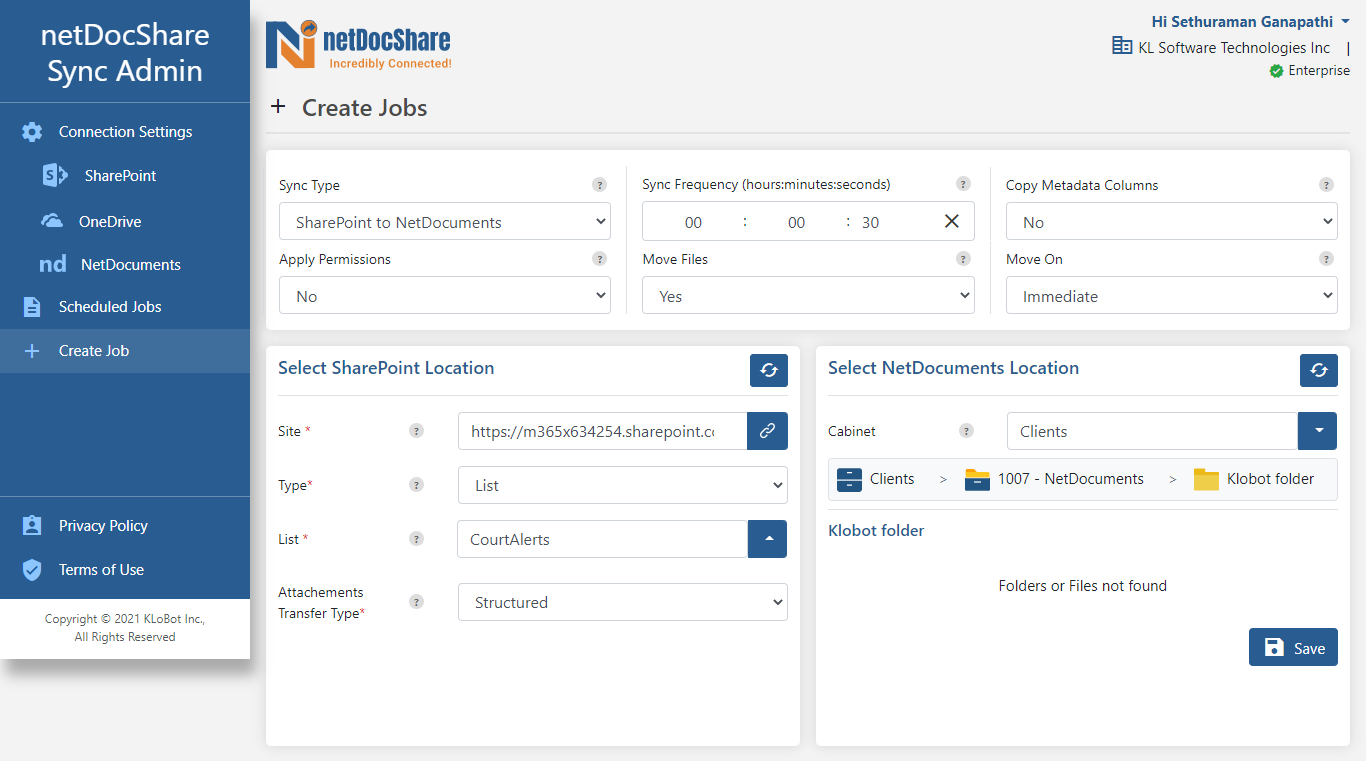
SharePoint List Sync: Its only applicable job type is SharePoint to NetDocuments
A User should select the Sync Type as SharePoint to NetDocuments and then should select “No in the Copy Metadata Columns, select “No” in Apply Permissions and “No” in Move Files.
Users entered the Site Connection and Click Connect icon under the SharePoint Connection section.
Select Type List and List Name fields are displayed once Users enter the Site URL and Click Connect icon.
Select the Attachment Transfer type as Flatten.
Under NetDocuments section Users select the NetDocuments destination.
Now Click Save.
Created Job is displayed under the Scheduled Job page.
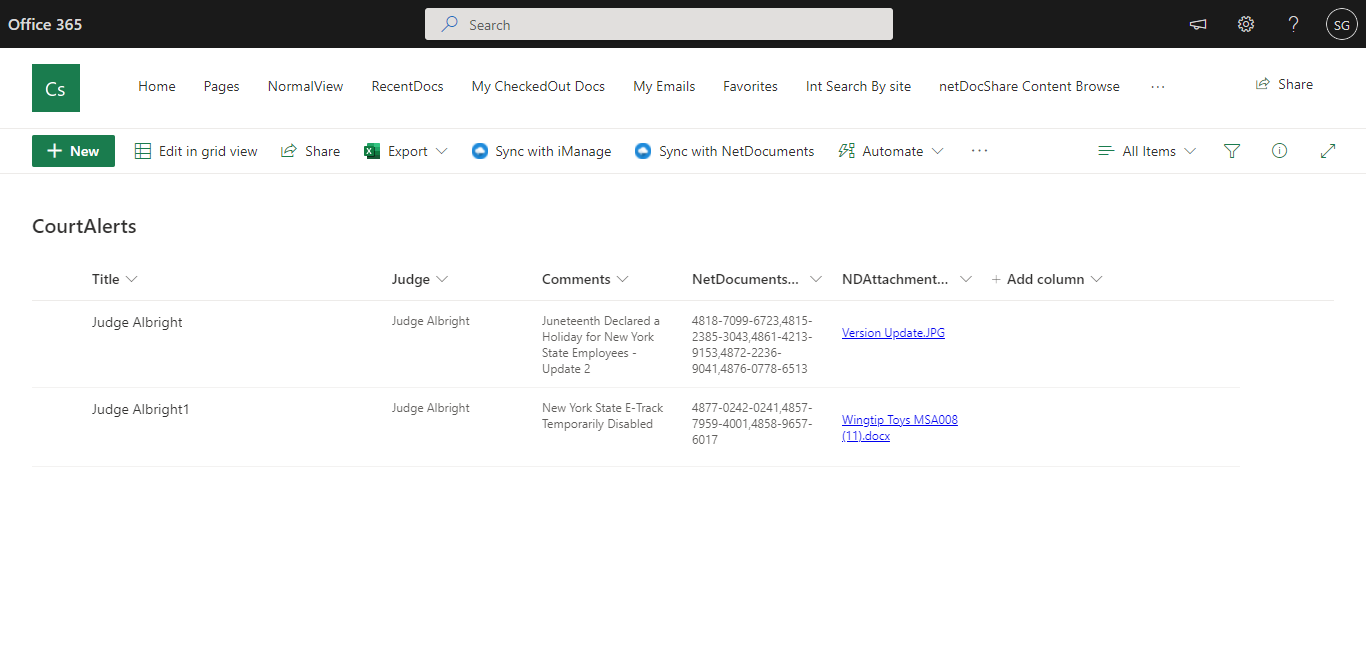
Selected SharePoint list attachments are synced to NetDocuments.

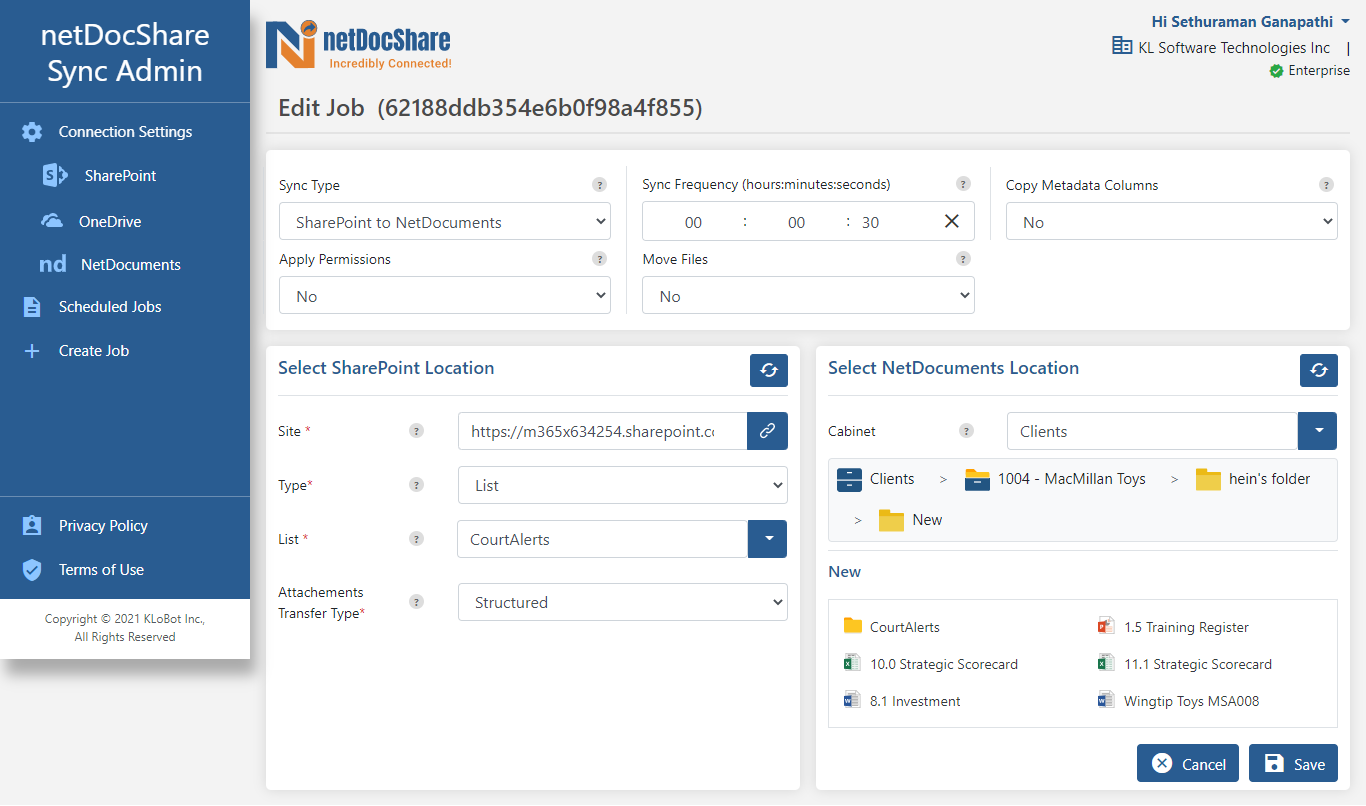
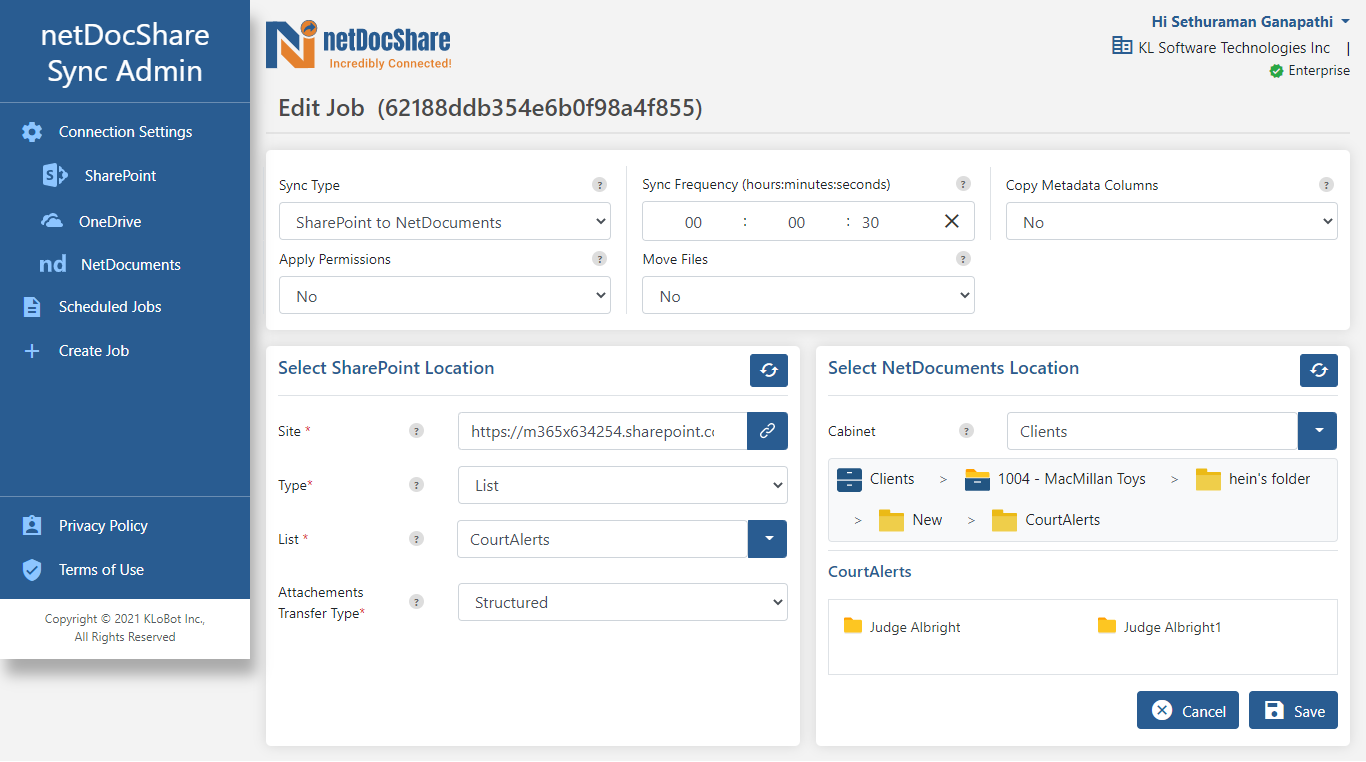
List Sync: SharePoint to NetDocuments (Structured)
Users select Attachments Transfer Type as Structured and SharePoint List and click Save.
All the selected files and folders have now synced SharePoint to NetDocuments.

List Sync Job is created, and Selected SharePoint List attachments are synced to NetDocuments in the folder Structured.
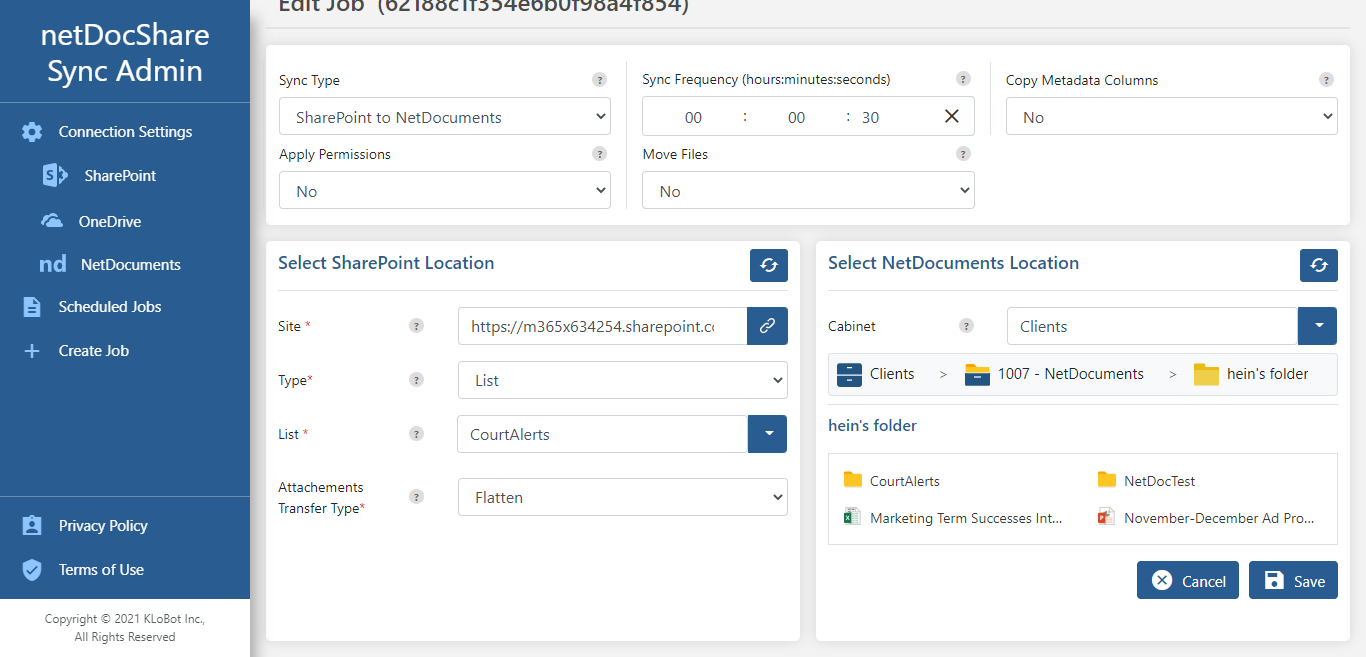
List Move: SharePoint to NetDocuments
List Move functionality is applicable only for SharePoint to NetDocuments.
Select the Move Files as “Yes” and Move On fields as “Immediate”.
User selects Attachments Transfer Type as Structured and SharePoint List and clicks Save.
All the selected SharePoint List files are moved from SharePoint to NetDocuments, and ND URL column is added in the selected SharePoint list.
Created List Move Job is displayed under the Scheduled Job page.
All the selected List Attachments are moved from SharePoint to NetDocuments.

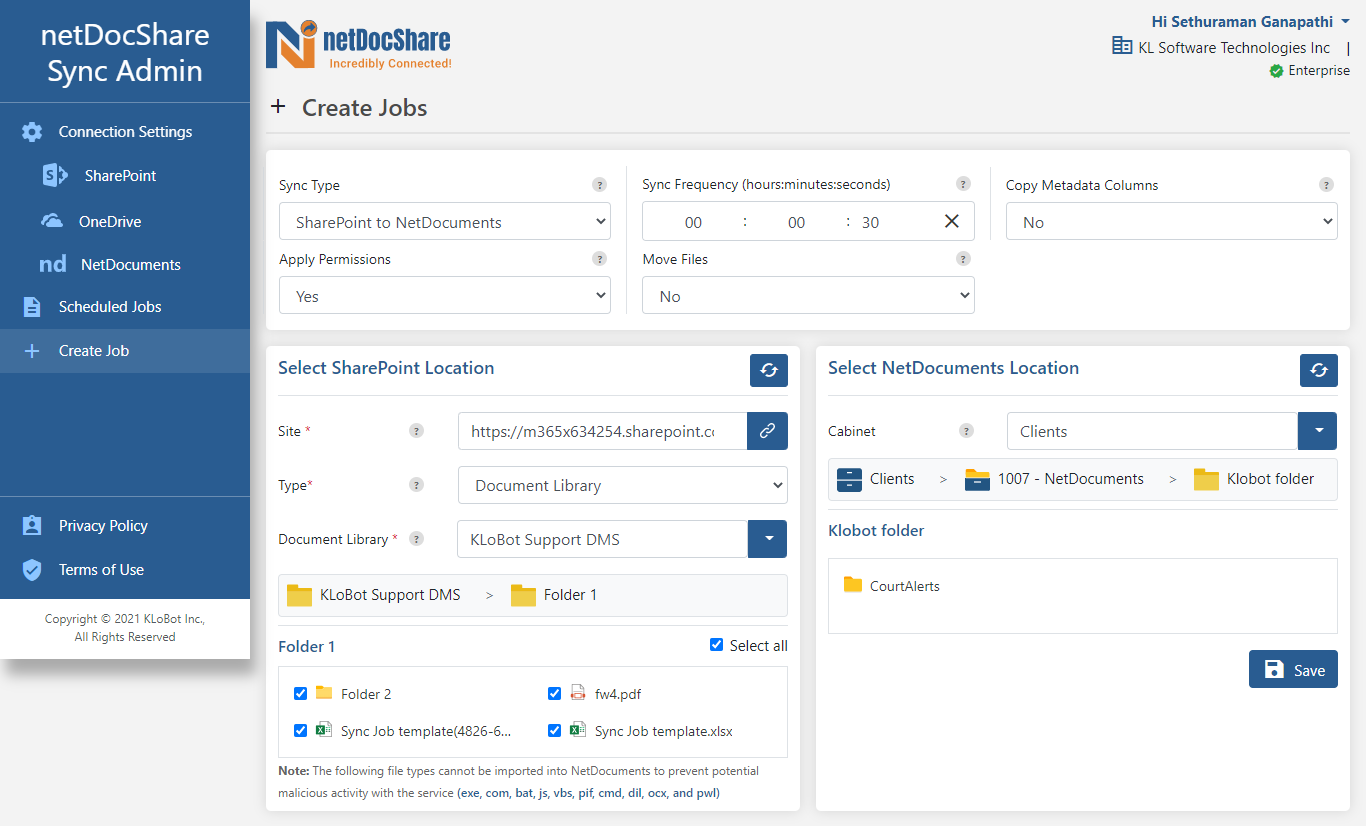
SharePoint to NetDocuments: Apply Permissions
Any changes that happen, for example Metadata changes, permissions, renaming the folders, renaming the files, delete files and new files then sync happens in SharePoint and NetDocuments in real time.
Users can select the Sync Type as SharePoint to NetDocuments, Copy Metadata Columns as “No”, Apply Permissions as “Yes” and Move Files as “No”.
Users can enter the Site Connection and click the Connect icon under the SharePoint Connection section.
Type and Document Library fields are displayed once a User enters the Site URL and clicks the Connect icon.
Users can select Type as Documents Library and then can select Documents from the Document Library.
The relevant Documents Library folders and documents are displayed under the SharePoint section.
Users can click any Folder or select all the Folders and Files.
Under the NetDocuments section Users can select the NetDocuments destination and click Save.
Created Job is displayed under the Scheduled Job page.
All the selected files and folders have synced SharePoint to NetDocuments.

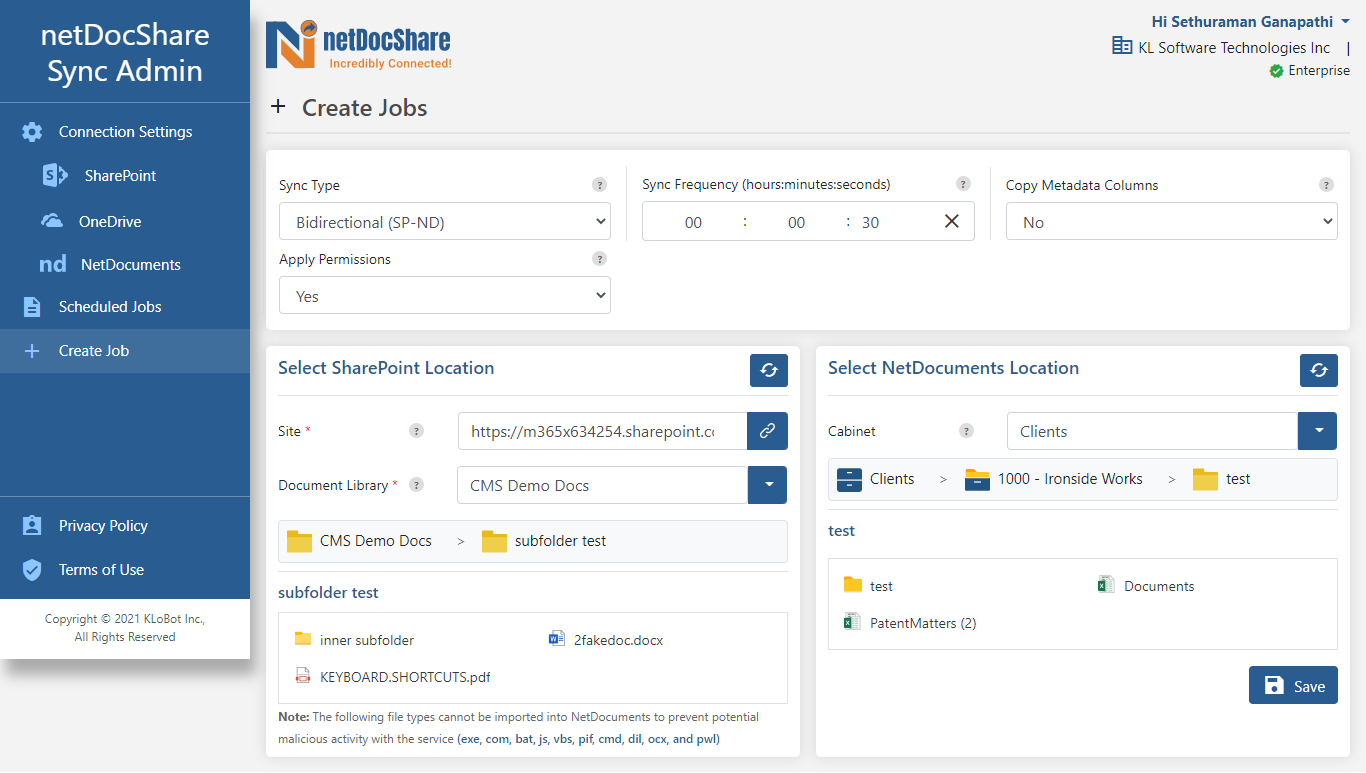
Bi-Directional Sync: SharePoint to NetDocuments
Bi-Directional Sync is used to sync the files and folders NetDocuments and SharePoint. And Column metadata synced NetDocuments and SharePoint
All the files and folders are to be synced on both the places: SharePoint and NetDocuments.
Any changes that happen on NetDocuments or SharePoint for example, Metadata changes, permissions, renaming the folders or renaming the files, deleting, and adding new files results in files and folders to sync in SharePoint and NetDocuments.
Sync Job Type is Bi-Directional (SharePoint to NetDocuments).
User clicks Create Job.
Create Job Page is displayed
The following fields are displayed on the Create Job page
- Sync Type- Default selected as SharePoint to NetDocuments
- Copy Metadata Columns
- Apply Permissions
Users can select the Sync Type as Bi-Directional (SharePoint -NetDocuments) and Copy Metadata Columns as “No” and Apply Permissions as “No or Yes”.
Users enter the Site Connection and click Connect icon under the SharePoint Connection section.
Type and Document Library fields are displayed once Users enter the Site URL and click Connect icon.
Users select Type as Documents Library and select the Document Library as New.
The relevant Documents Library folders and documents are displayed under the SharePoint section.
Under NetDocuments section Users select the NetDocuments destination.
Now click Save.
Created Job is displayed under the Scheduled Job page.
Selected SharePoint Document Library and NetDocuments have synced and vice versa.
Bi-Directional -Column Metadata Sync : SharePoint to NetDocuments
Bi-Directional Sync is used to sync the files and folders NetDocuments and SharePoint. And Column metadata synced NetDocuments and SharePoint
All the files and folders are to be synced on both the places: SharePoint and NetDocuments.
Any changes that happen on NetDocuments or SharePoint for example, Metadata changes, permissions, renaming the folders or renaming the files, deleting, and adding new files results in files and folders to sync in SharePoint and NetDocuments.
Sync Job Type is Bi-Directional (SharePoint to NetDocuments).
User clicks Create Job.
Create Job Page is displayed.
The following fields are displayed on the Create Job page
- Sync Type- Default selected as SharePoint to NetDocuments
- Copy Metadata Columns
- Apply Permissions
Users can select the Sync Type as Bi-Directional (SharePoint -NetDocuments) and Copy Metadata Columns as “Yes” and Apply Permissions as “No or Yes”.
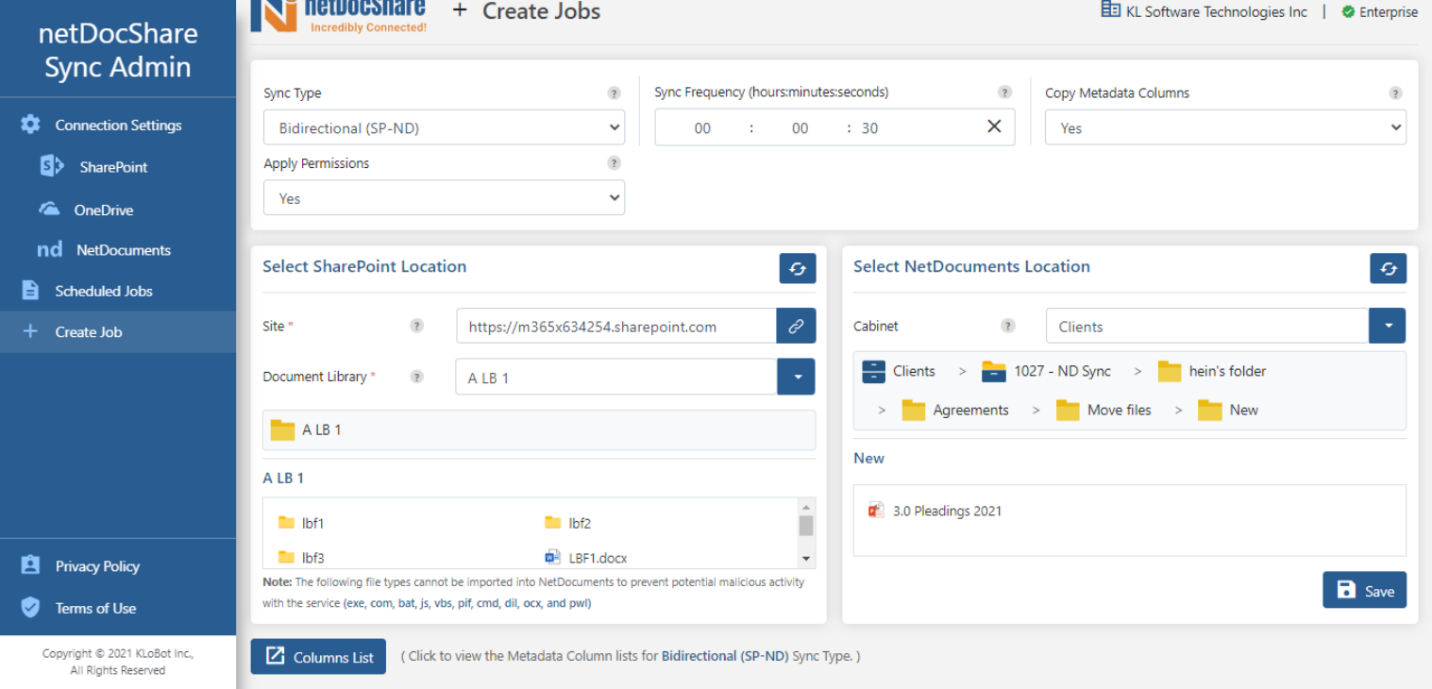
Users enter the Site Connection and click Connect icon under the SharePoint Connection section.
Type and Document Library fields are displayed once Users enter the Site URL and click Connect icon.
Users select Type as Documents Library and select the Document Library as New.
The relevant Documents Library folders and documents are displayed under the SharePoint section.
Under NetDocuments section Users select the NetDocuments destination.
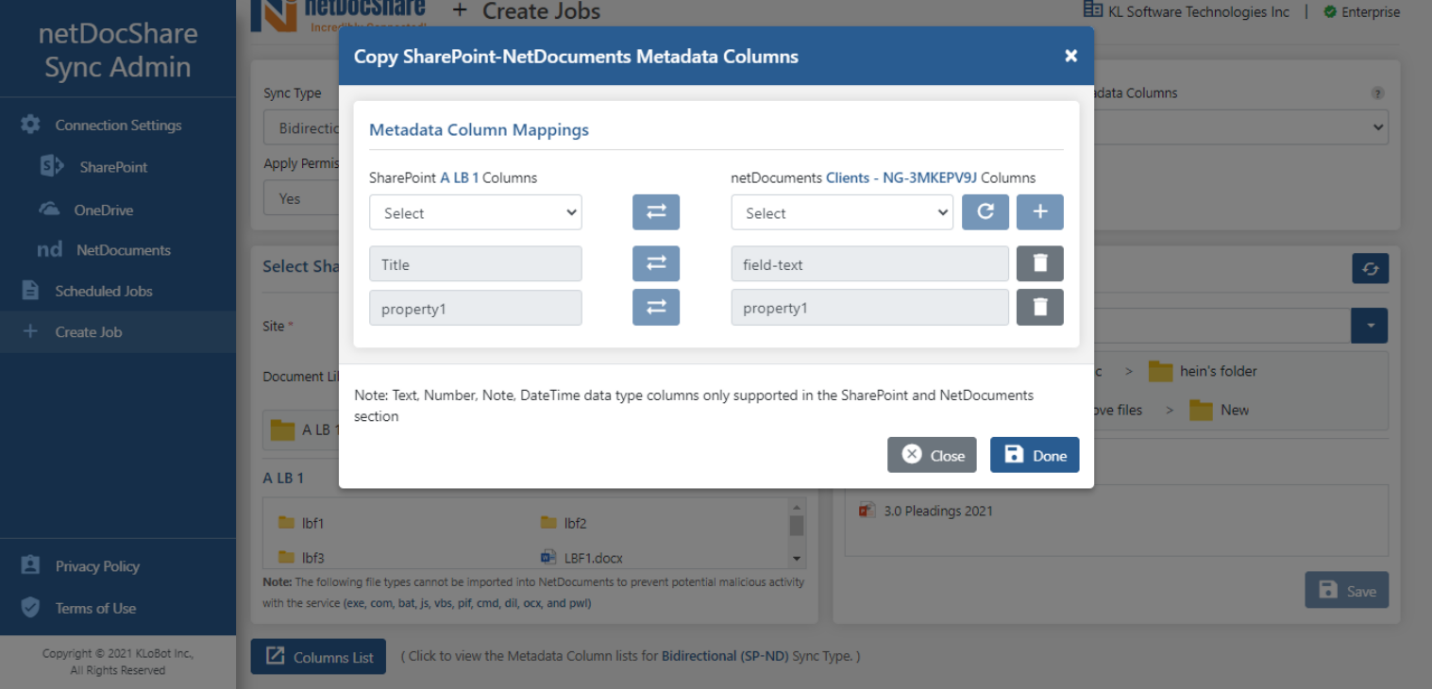
Click Column List Button
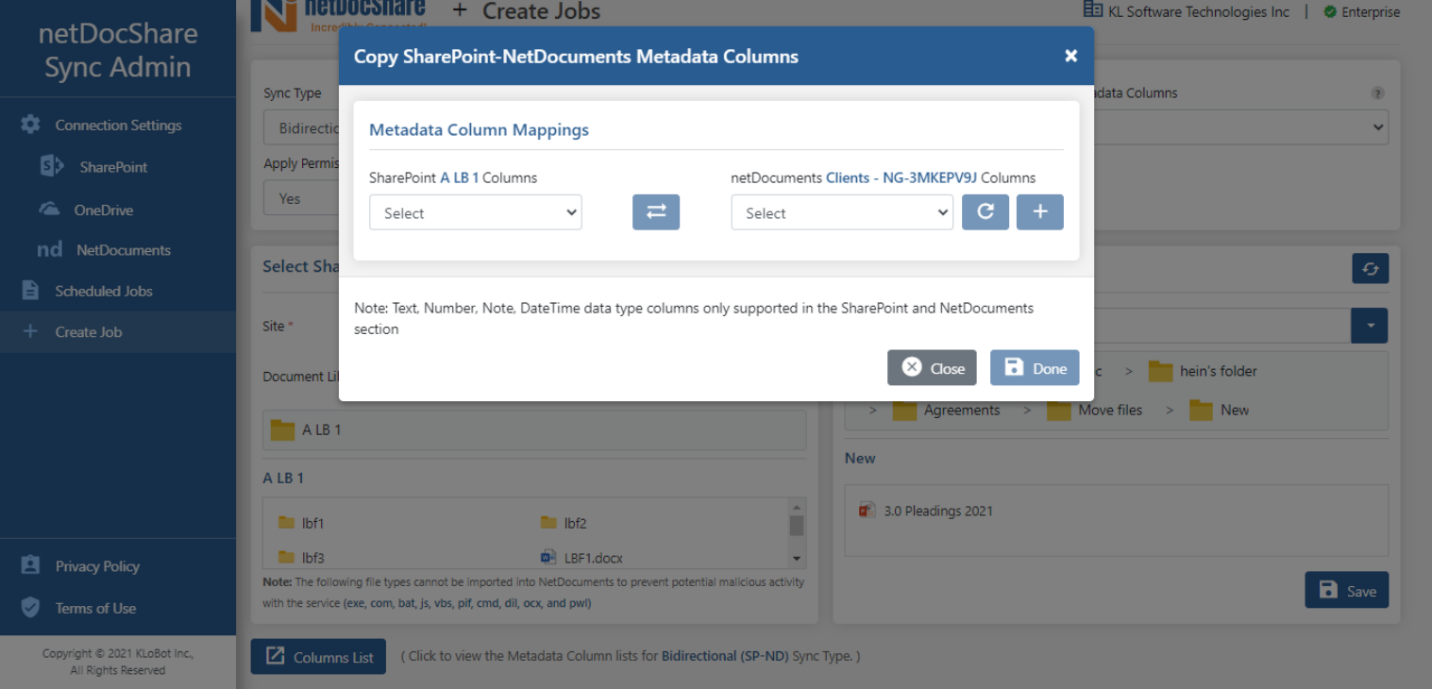
Select the Column’s under SharePoint and Netdocuments section and Click Done
Now click Save.
Created Job is displayed under the Scheduled Job page.
Selected SharePoint Document Library and NetDocuments have synced and vice versa.
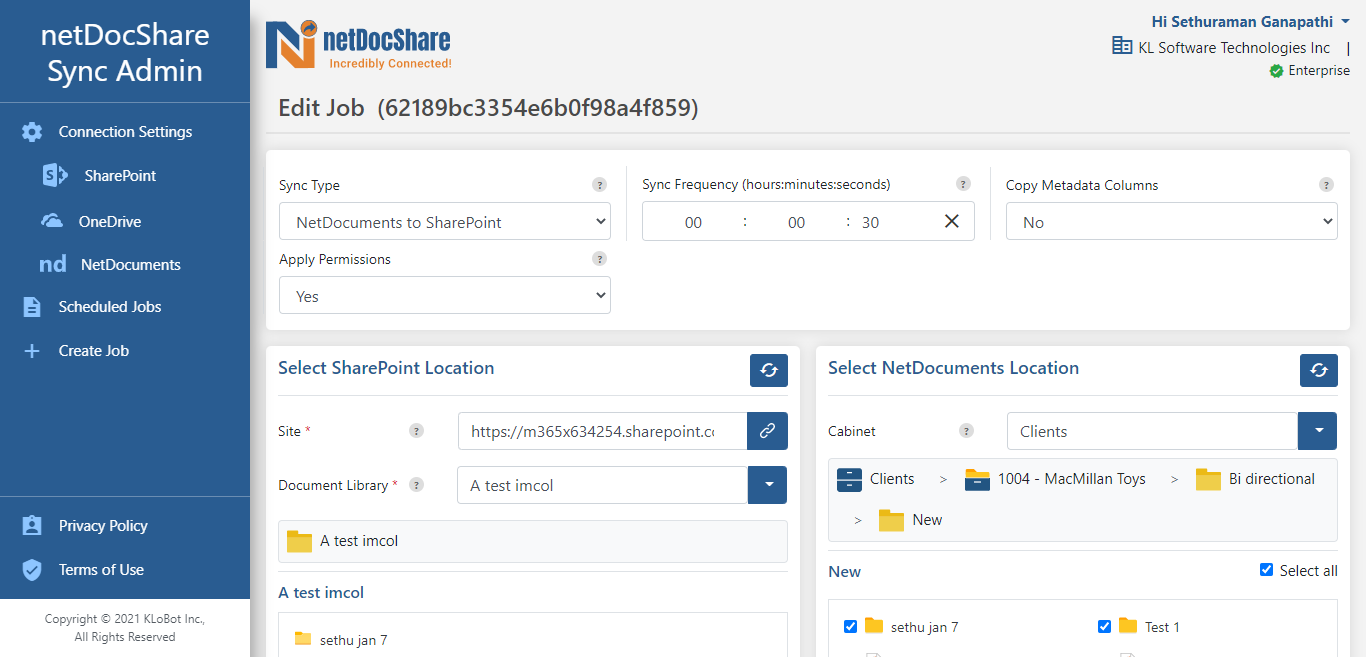
NetDocuments to SharePoint Sync
Sync the files and folders NetDocuments to SharePoint.
Any changes happen for example, Metadata changes, permissions, renaming the folders or renaming the files, deleting, and adding new files are synced in the NetDocuments, and files and folders are synced in SharePoint in real time.
Users click Create Job.
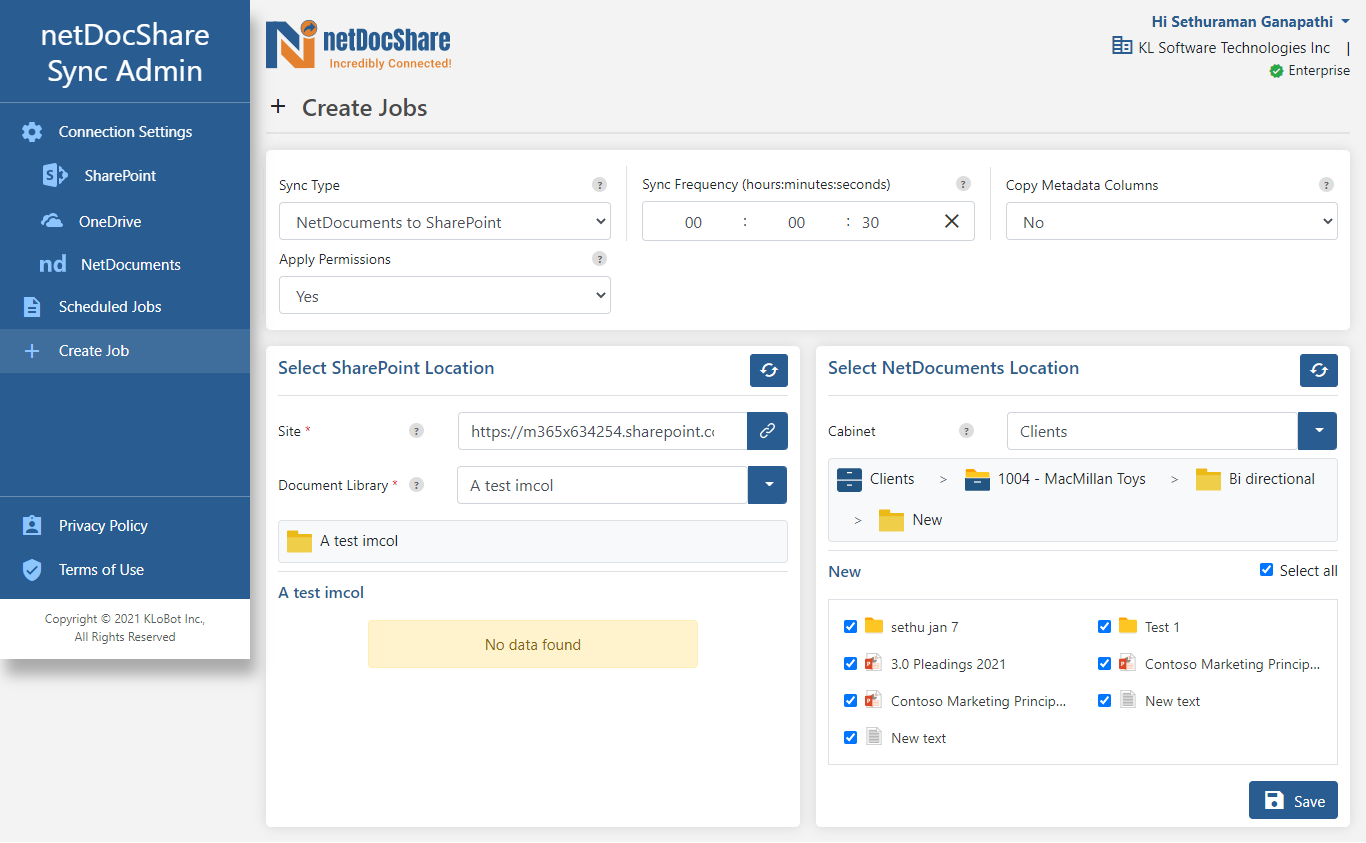
Users select the Sync Type as NetDocuments to SharePoint and Copy Metadata Columns as “No” and Apply Permissions as “Yes”.
Users enter the Site Connection and click the Connect icon under the SharePoint Connection section.
Type and Document Library fields are displayed once Users entered the Site URL and click the Connect icon.
The relevant Documents Library folders and documents are displayed under the SharePoint section.
Select the SharePoint location.
Under NetDocuments section Users select the NetDocuments destination.
Select the NetDocuments Workspaces and Folders.
Now click Save.
Selected files and folders have synced NetDocuments to SharePoint.

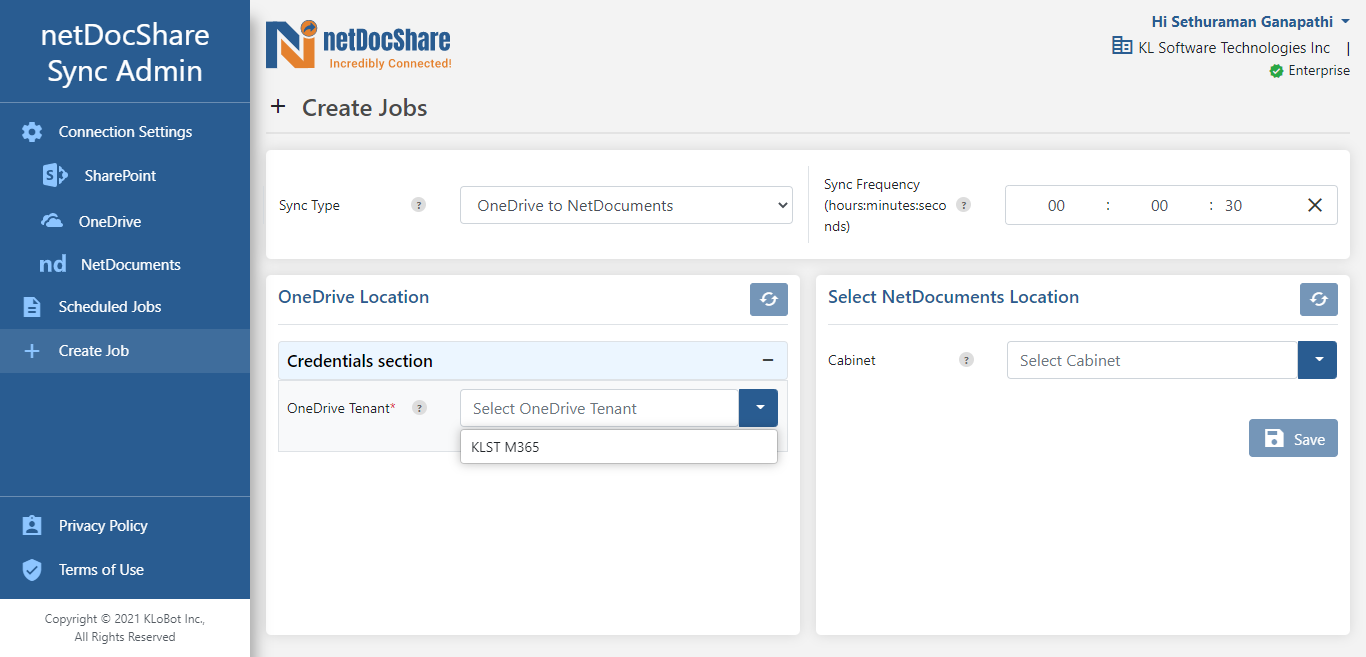
OneDrive to NetDocuments Sync
Users will sync the files and folders between NetDocuments and OneDrive.
Any changes that happen (permissions, renaming the folders or renaming the files, deleting, and adding new files) result in sync in the NetDocuments and OneDrive in real time.
Users Create the following Sync job type in netDocShare Sync Admin Portal
- OneDrive to NetDocument
- NetDocuments to OneDrive
- Bi-Directional (OneDrive – NetDocuments)
Users can select the Sync Type as OneDrive to NetDocuments
Select the OneDrive Tenant.
Enter the OneDrive User details.
The relevant User’s Document folders and documents are displayed.
Users can click on any Folder or select all the Folders and Files.
Under NetDocuments section Users select the NetDocuments destination.
Now click Save.
Selected files and folders have synced OneDrive to NetDocuments.
Selected files and folders have synced NetDocuments to SharePoint.
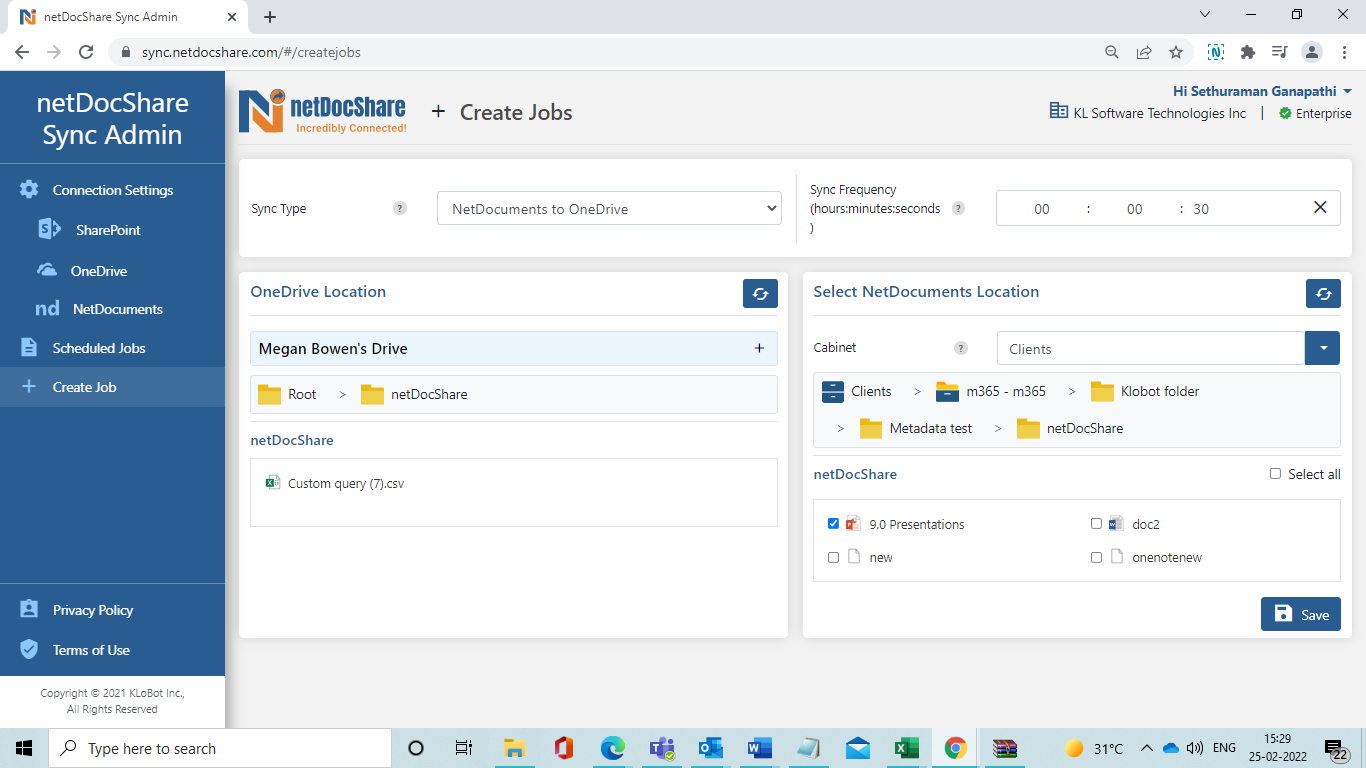
NetDocuments to OneDrive
Sync Job Type is NetDocuments to OneDrive.
Users select the Sync Type as NetDocuments
Then select the OneDrive Tenant.
Users enter the OneDrive User details.
The relevant User’s Documents folders and documents are displayed.
Under NetDocuments section Users select the NetDocuments Source.
Then click Save.
Selected files and folders have synced NetDocuments to OneDrive.

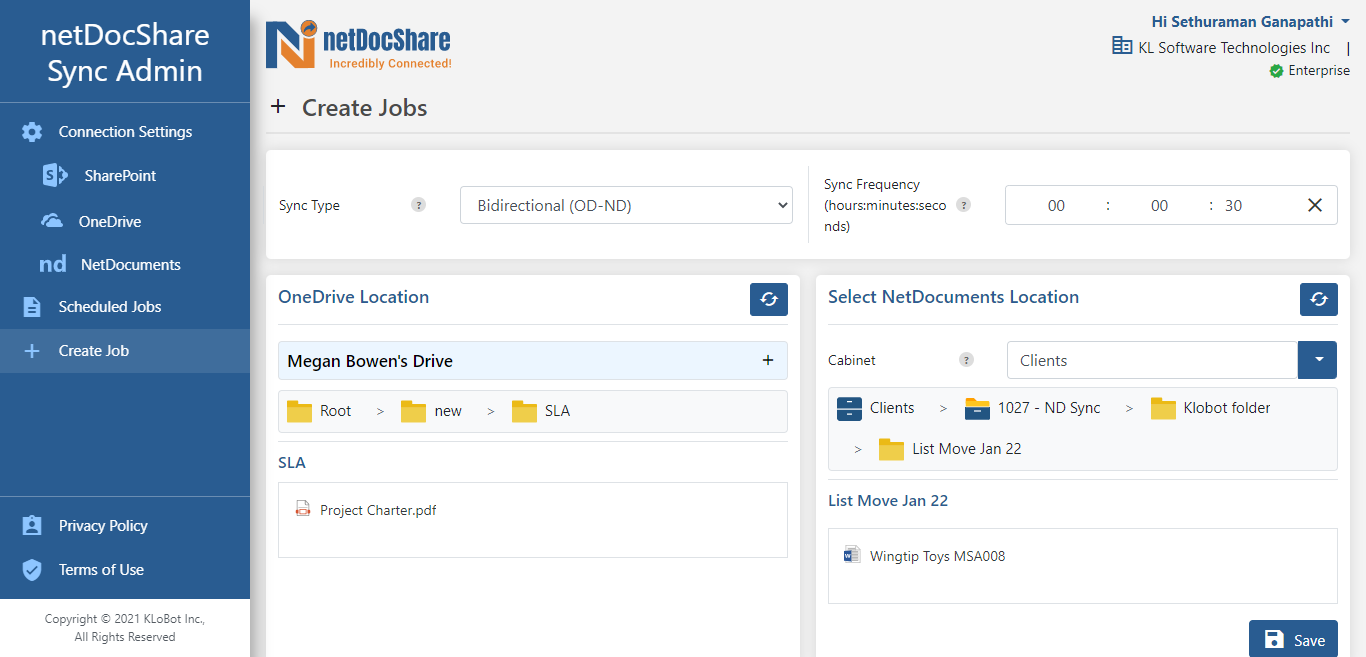
Bi-Directional Sync: OneDrive to NetDocuments
Users select the Sync Type as Bi-Directional (OneDrive – NetDocuments)
Then select the OneDrive Tenant.
Then enter the OneDrive User details.
The relevant Users Documents folders and documents are displayed.
Under NetDocuments section Users select the NetDocuments Source.
Now click Save.
Selected files and folders have synced NetDocuments and OneDrive and vice versa.